-

- ToolBar.CRD/WPF
-
Products
-
COM Components
- Suite Complete Developer Solution. The eXSuite provides a series of powerful and easy-to-use combo-list-tree-grid controls, gantt, gauge or chart controls to display your data, and much more. Includes more than 60 components, with over 300 objects, 11,000 functions, and more than 5,250,000 lines of source code...
- Agent The ExDialog control, similar with the Microsoft Office Assistant, is a new type of control that allows attaching pictures to your form or dialog. The control lets you add interactive personalities to your application or Web site.
- Button The Exontrol's exButton control is designed to enhance your Windows-based programs by offering the look-and-feel of past and present GUI design elements. The control provides predefined button skins for Windows XP, Windows 95/98, and Mac 8.x buttons. Create your own skins for your buttons in minutes, using a WYSYWG skin builder. The ability to specify everything that control needs like graphical objects, transparent skins, HTML captions as simple text makes the exButton one of the most wanted button control on the market. The exButton control easily replaces the Standard Windows button by supporting most of the same properties, methods and events. In addition, you have complete control over how the button is to be displayed.
- CalcEdit Enrich your application with an easy-to-use edit control that supports arithmetic operations. Get results on the fly. The result is displayed as the user types the expression. The control handles double constants and arithmetic operations like +( addition ), - ( subtraction ), / ( division ), or * ( multiply ). The control is fully written in C++ using ATL. The control doesn't require additional files or libraries like MFC or else.
- Calculator Exontrol's ExCalc component provides calculator features to your application. The component provides implementation for basic arithmetic operations like addition, subtraction, division and multiplication. In addition, you can configure the layout of the calculator the way you want, including new mathematical operations. The component provides flat and drop down version, so you can have the calculator into a drop down field too.
- Calendar The ExCalendar library contains two components, simple version and drop-down version that allow you to select a date with a nice GUI. You can select the date between 1/1/100 and 12/31/9999, Both versions support images, colors, font attributes, tooltips for any date.
- CascadeTree The eXCascadeTree component is a multiple-columns-tree-view component that uses miller columns visualization to display your data. The Miller columns (also known as Cascading Lists) are a browsing/visualization technique that can be applied to tree structures.
- ComboBox The eXComboBox represents some of the most advanced combobox technology available in the components marketplace. A combo box is a commonly-used GUI tool. It is a combination of a drop-down list or list box and a single-line textbox, allowing the user either to type a value directly into the control or choose from the list of existing options.
- ContextMenu The eXContextMenu component displays and handles a context menu (also called contextual, shortcut, and popup or pop-up menu). A context menu is a menu in a graphical user interface (GUI) that appears upon user interaction, such as a right-click mouse operation.
- DataView Exontrol's new exRecord control is a container component that displays a set of editors added manually or bounded to a table in a database.
- Edit Add to your applicaton an easy-to-use edit control that supports built-in HTML format, and syntax highlighting as well. You can define your own keywords and expressions using HTML tags. The control doesn't require additional files or libraries like MFC, VB or anything else, and does not subclass the system's EDIT window class.
- ExplorerBar The ExplorerBar component, an accurate reproduction of the Microsoft Windows XP Explorer Bar, provides an intuitive user-interface when large amounts of information need to be presented.The object model is rich and intuitive.
- ExplorerTree Add structured navigation functionality to your applications. The ExplorerTree component adds navigation functionality to your applications, it brings simple information structuring and easy application navigation.
- Expression The Exontrol's eXPression component is a syntax-editor that helps you to define, view, edit and evaluate expressions.
- FileView Provide rich display of file and folder information from within your applications. ExFileView is an ActiveX component for creating Windows Explorer-style functionality. The ExFileView simulates a FolderView control as well.
- FolderView Exontrol's new ExFolderView component provides a folder tree-list view which is identical with the left pane of your Windows Explorer.
- Gantt The Exontrol's ExGantt component is our approach to create timeline charts (also known as Gantt charts). Gantt chart is a time-phased graphic display of activity durations. Activities are listed with other tabular information on the left side with time intervals over the bars. Activity durations are shown in the form of horizontal bars. The exGantt component lets the user changes its visual appearance using skins, each one providing an additional visual experience that enhances viewing pleasure.
- Gauge The eXGauge / eXLayers library provides graphics capabilities to visually display and edit the amount, level, or contents of something. The view can show one or more layers, where each layer can display one or more transparent pictures, HTML captions which can be clipped, moved, rotated or combination of them, by dragging the mouse, rolling the mouse wheel, or using the keyboard.
- Grid Exontrol's new eXGrid control an easy-to-implement tree-grid control, provides swift and robust performance and a wide range of formatting features that distinguish it from other grids. The eXGrid is a multi-purpose data visualization system that can display information as a tree, a grid or list, or a combination of both - in either data-bound or unbound mode. This unique synergy between a traditional grid and a traditional treeview allows you to create cutting-edge and visually appealing application interfaces for your end-users.
- Grid-Gantt The Exontrol's eXG2antt component is an editable tree-grid component that includes Gantt chart features. The ex(G)rid-ex(G)antt, shortly exG2antt or ex2Gantt, combines the exGrid and exGantt components in a standalone component. The exG2antt library lets the user changes its visual appearance using skins, each one providing an additional visual experience that enhances viewing pleasure.
- Grid-Gantt (Host) The ExG2Host is an extension of the ExG2antt ( Exontrol's Grid-Gantt component ) with full database support ( ADO, DAO, XML). In other words, the ExG2Host loads and saves automatically the host's data (including the hierarchy) to one or more databases. You can map a data field from the data-source, to a property of one object in the host/gantt control, and the control automatically updates the field when it is required. In the same manner, you can automatically save the control's layout, so next time the control is running it automatically get displayed the same way as it was closed.
- HTML Display and edit built-in HTML without relying on Internet Explorer. exHTML is a display/edit engine for our built-in HTML format. It is written from scratch in C++/C#. It does not rely on IE for rendering HTML, and its functionality is similar to a Web browser for display/edit purposes. exHTML can be used for the provision of extremely flexible user interfaces generated on demand. It can also function as a complex layout management system for text, controls, and graphics. The control doesn't require additional files or libraries like MFC, VB or anything else, and does not subclass the system's EDIT window class.
- ICalendar The ExICalendar library implements the ICalendar data format, according with Internet Calendaring and Scheduling Core Object Specification, RFC 5545. The iCalendar data format represents exchanging calendaring and scheduling information such as events, to-dos, journal entries, and free/busy information, independent of any particular calendar service or protocol. The iCalendar format is suitable as an exchange format between applications or systems. The format is defined in terms of a MIME content type.
- Label The Exontrol's eXLabel component provides HTML labels for your forms or dialogs.
- List Add an advanced List control to your application. The exList component displays and edit your tabular data. The exList component lets the user changes its visual appearance using skins, each one providing an additional visual experience that enhances viewing pleasure. Skins are relatively easy to build and put on any part of the control.
- ListBar The ExListBar component, an accurate reproduction of the Microsoft Outlook Bar, provides an intuitive user-interface when large amounts of information need to be presented. The ExListBar supports horizontal or vertical orientation. The object model is rich and intuitive.
- MaskEdit When you have several people entering data in your database, you can define how users must enter data in specific fields to help maintain consistency and to make your database easier to manage. For example, you can set an input mask for a form so that users can only enter telephone numbers in the Swedish format or addresses in the French format.
- Menu The ExMenu component is a complete new type of control that displays and handles more than a menu for your application. The ExMenu simulates menu bar, popup menu, options button, toolbar, pick list, and more. Make you application more intuitive using the ExMenu.
- Miller The eXMiller component is a file-folder-view component that uses miller columns visualization to display system folders and files. The Miller columns (also known as Cascading Lists) are a browsing/visualization technique that can be applied to tree structures.
- NETHost The Exontrol's NETHost control allows you to use any Windows Form User Control (/NET framework) on your /COM windows / forms / dialogs.
- OrgChart The ExOrgChart component permits the totally automatic generation of organigrams. An organigram generally provides a clear picture of the hierarchical position of the various actors. The ExOrgChart control shows a hierarchical display of nodes, each one having an HTML caption, pictures and icons aligned to any side of the node.
- Pivot The Exontrol's eXPivot tool is our approach to provide data summarization, as a pivot table. A pivot-table can automatically sort, count, total or give the average of the data stored in one table or spreadsheet. The user sets up and changes the summary's structure by dragging and dropping fields graphically.
- PopupMenu The ExPopupMenu component allows you to display and handle a shortcut menu (window popup menu) or a window's menu bar. The ExPopupMenu control contains also a MenuButton object that allows attaching a popup menu to a push button. Building the menu is more than intuitive because the control provides a WYSIWYG editor, at design time.
- Print The Exontrol ExPrint component is an advanced printing system specifically to bring your User Interface to the printed page. The ExPrint adds powerful print and preview capabilities to your forms, dialog boxes or other windows. The ExPrint component provides Print and Print Preview features for components like: exGrid, exTree, exList, exCalendar, exComboBox, exPropertiesList, exEdit, exFileView, exOrgChart and so on.
- PropertiesList The ExPropertiesList control (similar to the control used to manipulate properties in Visual Studio) provides an efficient, intuitive and visually compact way to handle data input with minimal coding and user interface design.
- RadialMenu The eXRadialMenu ( radial or pie menu) component is similar to the Microsoft.s OneNote radial menu with ability to customize the appearance and functionality. The component is designed using tree structure of tools and tool collections within the tools
- Ribbon The eXRibbon component, similar with the Microsoft Office's "Fluent User Interface", or Ribbon, allows you to display graphical control elements in the form of a set of toolbars placed on several tabs.
- RolList Exontrol's new and innovative exRolList control handles and displays lists on an elliptic shape. The exRolList rotates the list to let items being visible, and so no scrolls are required. You never seen such of control so please take your time and check it. Your user interface will be rich, new and attractive.
- Scheduler The eXSchedule tool is our approach to provide scheduling of appointments into your application.
- ScrollBar The Exontrol's newly exScrollBar control simulates vertical or horizontal scroll bar, slider, track, volume or gauge controls.
- ShellView Exontrol's new ExShellView component provides a file list view which is identical with the right pane of your Windows Explorer.
- SkinBox Exontrol's new ExSkinBox offers you skinable message and input boxes that can display HTML format and custom images as well.
- Slider The Exontrol's eXSlider component allows you adding skinable sliders to your forms or dialogs.
- SplitBar The Exontrol's eXSplitBar component, helps you to automatically resizes the left/right or top/bottom components, while user drags the split bar to a new position. The splitter control is used to resize docked controls at run time. The splitter control is often used on forms with controls that have varying lengths of data to present, like Windows Explorer, whose data panes contain information of varying widths at different times.
- StatusBar Add a fuly customizable statusbar to your application. Features include: ability to layout the panels as you wish using the CRD strings, skinning, built-in HTML support, tooltip support, owner draw support, icons, custom-size pictures, WYSWYG Template editor, semi-transparent colors, progress-bar support, and much more...
- Surface The eXSurface lets you organize your objects to a surface. You can use the tool to generate organigrams, diagrams, graphs, flowcharts and so on.
- Swimlane The ExSwimLane component let's you draw swim lane diagrams. A swim lane (or swimlane diagram) is a visual element used in process flow diagrams, or flowcharts, that visually distinguishes job sharing and responsibilities for sub-processes of a business process. Swim lanes may be arranged either horizontally or vertically.
- Tab The Exontrol ExTab component is a SKIN based TAB control. A tab control is analogous to the dividers in a notebook or the labels in a file cabinet.
- Thumbnail The Exontrol's eXThumbnail component provides thumbnail views for your files. Thumbnails are reduced-size versions of pictures or shell items, used to make it easier to scan and recognize them, serving the same role for images as a normal text index does for words.
- ToolBar The eXToolBar component arranges / groups as rows or columns, any kind of graphical control elements such as buttons, icons, drop downs, editors, and so on, to let user choose quickly, what function / procedure to run. The eXToolBar component is written from scratch, uses EBN technology to let the user changes its visual appearance using skins, and requires no dependencies to any other third party library.
- ToolBar.CRD The eXToolBar.CRD component is a graphical control element on which on-screen buttons, icons, menus, or other input or output elements are placed.
- ToolTip The Exontrol's ExToolTip provides featured tooltips for your application. The tooltip is a common graphical user interface element. It is used in conjunction with a cursor, usually a mouse pointer. The user hovers the cursor over an item, without clicking it, and a small box appears with supplementary information regarding the item being hovered over.
- Tree Add an enhanced exTree component to your application. exTree provides the entire range of capabilities you would expect to see in a state-of-the-art tree component. The exTree control simulates a simple tree, a multi-column tree, a list or a listview control.
- TreeCube The eXTreeCube library provides fisheye representation / cube map texturing of different components such as calendar , multiple - columns tree view and so on.
- XMLGrid Exontrol's new eXMLGrid control provides an innovative grid view look and handles data in XML fashion way. It provides swift and robust performance and a wide range of formatting features never seen on other grids. The eXMLGrid component can be seen as a generalized tree control that allows resizing the node's indentation at runtime. The eXMLGrid component lets the user changes its visual appearance using skins, each one providing an additional visual experience that enhances viewing pleasure. Skins are relatively easy to build and put on any part of the control.
-
NET Components
- Suite Complete Developer Solution. The eXSuite provides a series of powerful and easy-to-use combo-list-tree-grid controls, gantt, gauge or chart controls to display your data, and much more. Includes more than 60 components, with over 300 objects, 11,000 functions, and more than 5,250,000 lines of source code...
- Agent The ExDialog control, similar with the Microsoft Office Assistant, is a new type of control that allows attaching pictures to your form or dialog. The control lets you add interactive personalities to your application or Web site.
- Button The Exontrol's exButton control is designed to enhance your Windows-based programs by offering the look-and-feel of past and present GUI design elements. The control provides predefined button skins for Windows XP, Windows 95/98, and Mac 8.x buttons. Create your own skins for your buttons in minutes, using a WYSYWG skin builder. The ability to specify everything that control needs like graphical objects, transparent skins, HTML captions as simple text makes the exButton one of the most wanted button control on the market. The exButton control easily replaces the Standard Windows button by supporting most of the same properties, methods and events. In addition, you have complete control over how the button is to be displayed.
- CalcEdit Enrich your application with an easy-to-use edit control that supports arithmetic operations. Get results on the fly. The result is displayed as the user types the expression. The control handles double constants and arithmetic operations like +( addition ), - ( subtraction ), / ( division ), or * ( multiply ). The control is fully written in C++ using ATL. The control doesn't require additional files or libraries like MFC or else.
- Calculator Exontrol's ExCalc component provides calculator features to your application. The component provides implementation for basic arithmetic operations like addition, subtraction, division and multiplication. In addition, you can configure the layout of the calculator the way you want, including new mathematical operations. The component provides flat and drop down version, so you can have the calculator into a drop down field too.
- Calendar The ExCalendar library contains two components, simple version and drop-down version that allow you to select a date with a nice GUI. You can select the date between 1/1/100 and 12/31/9999, Both versions support images, colors, font attributes, tooltips for any date.
- CascadeTree The eXCascadeTree component is a multiple-columns-tree-view component that uses miller columns visualization to display your data. The Miller columns (also known as Cascading Lists) are a browsing/visualization technique that can be applied to tree structures.
- ComboBox The eXComboBox represents some of the most advanced combobox technology available in the components marketplace. A combo box is a commonly-used GUI tool. It is a combination of a drop-down list or list box and a single-line textbox, allowing the user either to type a value directly into the control or choose from the list of existing options.
- ContextMenu The eXContextMenu component displays and handles a context menu (also called contextual, shortcut, and popup or pop-up menu). A context menu is a menu in a graphical user interface (GUI) that appears upon user interaction, such as a right-click mouse operation.
- DataView Exontrol's new exRecord control is a container component that displays a set of editors added manually or bounded to a table in a database.
- Edit Add to your applicaton an easy-to-use edit control that supports built-in HTML format, and syntax highlighting as well. You can define your own keywords and expressions using HTML tags. The control doesn't require additional files or libraries like MFC, VB or anything else, and does not subclass the system's EDIT window class.
- ExplorerBar The ExplorerBar component, an accurate reproduction of the Microsoft Windows XP Explorer Bar, provides an intuitive user-interface when large amounts of information need to be presented.The object model is rich and intuitive.
- ExplorerTree Add structured navigation functionality to your applications. The ExplorerTree component adds navigation functionality to your applications, it brings simple information structuring and easy application navigation.
- Expression The Exontrol's eXPression component is a syntax-editor that helps you to define, view, edit and evaluate expressions.
- FileView Provide rich display of file and folder information from within your applications. ExFileView is an ActiveX component for creating Windows Explorer-style functionality. The ExFileView simulates a FolderView control as well.
- FolderView Exontrol's new ExFolderView component provides a folder tree-list view which is identical with the left pane of your Windows Explorer.
- Gantt The Exontrol's ExGantt component is our approach to create timeline charts (also known as Gantt charts). Gantt chart is a time-phased graphic display of activity durations. Activities are listed with other tabular information on the left side with time intervals over the bars. Activity durations are shown in the form of horizontal bars. The exGantt component lets the user changes its visual appearance using skins, each one providing an additional visual experience that enhances viewing pleasure.
- Gauge The eXGauge / eXLayers library provides graphics capabilities to visually display and edit the amount, level, or contents of something. The view can show one or more layers, where each layer can display one or more transparent pictures, HTML captions which can be clipped, moved, rotated or combination of them, by dragging the mouse, rolling the mouse wheel, or using the keyboard.
- Grid Exontrol's new eXGrid control an easy-to-implement tree-grid control, provides swift and robust performance and a wide range of formatting features that distinguish it from other grids. The eXGrid is a multi-purpose data visualization system that can display information as a tree, a grid or list, or a combination of both - in either data-bound or unbound mode. This unique synergy between a traditional grid and a traditional treeview allows you to create cutting-edge and visually appealing application interfaces for your end-users.
- Grid-Gantt The Exontrol's eXG2antt component is an editable tree-grid component that includes Gantt chart features. The ex(G)rid-ex(G)antt, shortly exG2antt or ex2Gantt, combines the exGrid and exGantt components in a standalone component. The exG2antt library lets the user changes its visual appearance using skins, each one providing an additional visual experience that enhances viewing pleasure.
- HTML Display and edit built-in HTML without relying on Internet Explorer. exHTML is a display/edit engine for our built-in HTML format. It is written from scratch in C++/C#. It does not rely on IE for rendering HTML, and its functionality is similar to a Web browser for display/edit purposes. exHTML can be used for the provision of extremely flexible user interfaces generated on demand. It can also function as a complex layout management system for text, controls, and graphics. The control doesn't require additional files or libraries like MFC, VB or anything else, and does not subclass the system's EDIT window class.
- ICalendar The ExICalendar library implements the ICalendar data format, according with Internet Calendaring and Scheduling Core Object Specification, RFC 5545. The iCalendar data format represents exchanging calendaring and scheduling information such as events, to-dos, journal entries, and free/busy information, independent of any particular calendar service or protocol. The iCalendar format is suitable as an exchange format between applications or systems. The format is defined in terms of a MIME content type.
- Label The Exontrol's eXLabel component provides HTML labels for your forms or dialogs.
- List Add an advanced List control to your application. The exList component displays and edit your tabular data. The exList component lets the user changes its visual appearance using skins, each one providing an additional visual experience that enhances viewing pleasure. Skins are relatively easy to build and put on any part of the control.
- ListBar The ExListBar component, an accurate reproduction of the Microsoft Outlook Bar, provides an intuitive user-interface when large amounts of information need to be presented. The ExListBar supports horizontal or vertical orientation. The object model is rich and intuitive.
- MaskEdit When you have several people entering data in your database, you can define how users must enter data in specific fields to help maintain consistency and to make your database easier to manage. For example, you can set an input mask for a form so that users can only enter telephone numbers in the Swedish format or addresses in the French format.
- Miller The eXMiller component is a file-folder-view component that uses miller columns visualization to display system folders and files. The Miller columns (also known as Cascading Lists) are a browsing/visualization technique that can be applied to tree structures.
- NETHost The Exontrol's NETHost control allows you to use any Windows Form User Control (/NET framework) on your /COM windows / forms / dialogs.
- OrgChart The ExOrgChart component permits the totally automatic generation of organigrams. An organigram generally provides a clear picture of the hierarchical position of the various actors. The ExOrgChart control shows a hierarchical display of nodes, each one having an HTML caption, pictures and icons aligned to any side of the node.
- Pivot The Exontrol's eXPivot tool is our approach to provide data summarization, as a pivot table. A pivot-table can automatically sort, count, total or give the average of the data stored in one table or spreadsheet. The user sets up and changes the summary's structure by dragging and dropping fields graphically.
- Print The Exontrol ExPrint component is an advanced printing system specifically to bring your User Interface to the printed page. The ExPrint adds powerful print and preview capabilities to your forms, dialog boxes or other windows. The ExPrint component provides Print and Print Preview features for components like: exGrid, exTree, exList, exCalendar, exComboBox, exPropertiesList, exEdit, exFileView, exOrgChart and so on.
- PropertiesList The ExPropertiesList control (similar to the control used to manipulate properties in Visual Studio) provides an efficient, intuitive and visually compact way to handle data input with minimal coding and user interface design.
- RadialMenu The eXRadialMenu ( radial or pie menu) component is similar to the Microsoft.s OneNote radial menu with ability to customize the appearance and functionality. The component is designed using tree structure of tools and tool collections within the tools
- Ribbon The eXRibbon component, similar with the Microsoft Office's "Fluent User Interface", or Ribbon, allows you to display graphical control elements in the form of a set of toolbars placed on several tabs.
- Scheduler The eXSchedule tool is our approach to provide scheduling of appointments into your application.
- ScrollBar The Exontrol's newly exScrollBar control simulates vertical or horizontal scroll bar, slider, track, volume or gauge controls.
- ShellView Exontrol's new ExShellView component provides a file list view which is identical with the right pane of your Windows Explorer.
- SkinBox Exontrol's new ExSkinBox offers you skinable message and input boxes that can display HTML format and custom images as well.
- Slider The Exontrol's eXSlider component allows you adding skinable sliders to your forms or dialogs.
- SplitBar The Exontrol's eXSplitBar component, helps you to automatically resizes the left/right or top/bottom components, while user drags the split bar to a new position. The splitter control is used to resize docked controls at run time. The splitter control is often used on forms with controls that have varying lengths of data to present, like Windows Explorer, whose data panes contain information of varying widths at different times.
- StatusBar Add a fuly customizable statusbar to your application. Features include: ability to layout the panels as you wish using the CRD strings, skinning, built-in HTML support, tooltip support, owner draw support, icons, custom-size pictures, WYSWYG Template editor, semi-transparent colors, progress-bar support, and much more...
- Surface The eXSurface lets you organize your objects to a surface. You can use the tool to generate organigrams, diagrams, graphs, flowcharts and so on.
- Swimlane The ExSwimLane component let's you draw swim lane diagrams. A swim lane (or swimlane diagram) is a visual element used in process flow diagrams, or flowcharts, that visually distinguishes job sharing and responsibilities for sub-processes of a business process. Swim lanes may be arranged either horizontally or vertically.
- Tab The Exontrol ExTab component is a SKIN based TAB control. A tab control is analogous to the dividers in a notebook or the labels in a file cabinet.
- Thumbnail The Exontrol's eXThumbnail component provides thumbnail views for your files. Thumbnails are reduced-size versions of pictures or shell items, used to make it easier to scan and recognize them, serving the same role for images as a normal text index does for words.
- ToolBar The eXToolBar component arranges / groups as rows or columns, any kind of graphical control elements such as buttons, icons, drop downs, editors, and so on, to let user choose quickly, what function / procedure to run. The eXToolBar component is written from scratch, uses EBN technology to let the user changes its visual appearance using skins, and requires no dependencies to any other third party library.
- ToolBar.CRD The eXToolBar.CRD component is a graphical control element on which on-screen buttons, icons, menus, or other input or output elements are placed.
- ToolTip The Exontrol's ExToolTip provides featured tooltips for your application. The tooltip is a common graphical user interface element. It is used in conjunction with a cursor, usually a mouse pointer. The user hovers the cursor over an item, without clicking it, and a small box appears with supplementary information regarding the item being hovered over.
- Tree Add an enhanced exTree component to your application. exTree provides the entire range of capabilities you would expect to see in a state-of-the-art tree component. The exTree control simulates a simple tree, a multi-column tree, a list or a listview control.
- TreeCube The eXTreeCube library provides fisheye representation / cube map texturing of different components such as calendar , multiple - columns tree view and so on.
- XMLGrid Exontrol's new eXMLGrid control provides an innovative grid view look and handles data in XML fashion way. It provides swift and robust performance and a wide range of formatting features never seen on other grids. The eXMLGrid component can be seen as a generalized tree control that allows resizing the node's indentation at runtime. The eXMLGrid component lets the user changes its visual appearance using skins, each one providing an additional visual experience that enhances viewing pleasure. Skins are relatively easy to build and put on any part of the control.
-
WPF Components
- Suite Complete Developer Solution. The eXSuite provides a series of powerful and easy-to-use combo-list-tree-grid controls, gantt, gauge or chart controls to display your data, and much more. Includes more than 60 components, with over 300 objects, 11,000 functions, and more than 5,250,000 lines of source code...
- CalcEdit Enrich your application with an easy-to-use edit control that supports arithmetic operations. Get results on the fly. The result is displayed as the user types the expression. The control handles double constants and arithmetic operations like +( addition ), - ( subtraction ), / ( division ), or * ( multiply ). The control is fully written in C++ using ATL. The control doesn't require additional files or libraries like MFC or else.
- Calendar The ExCalendar library contains two components, simple version and drop-down version that allow you to select a date with a nice GUI. You can select the date between 1/1/100 and 12/31/9999, Both versions support images, colors, font attributes, tooltips for any date.
- CascadeTree The eXCascadeTree component is a multiple-columns-tree-view component that uses miller columns visualization to display your data. The Miller columns (also known as Cascading Lists) are a browsing/visualization technique that can be applied to tree structures.
- ComboBox The eXComboBox represents some of the most advanced combobox technology available in the components marketplace. A combo box is a commonly-used GUI tool. It is a combination of a drop-down list or list box and a single-line textbox, allowing the user either to type a value directly into the control or choose from the list of existing options.
- ContextMenu The eXContextMenu component displays and handles a context menu (also called contextual, shortcut, and popup or pop-up menu). A context menu is a menu in a graphical user interface (GUI) that appears upon user interaction, such as a right-click mouse operation.
- Edit Add to your applicaton an easy-to-use edit control that supports built-in HTML format, and syntax highlighting as well. You can define your own keywords and expressions using HTML tags. The control doesn't require additional files or libraries like MFC, VB or anything else, and does not subclass the system's EDIT window class.
- ExplorerBar The ExplorerBar component, an accurate reproduction of the Microsoft Windows XP Explorer Bar, provides an intuitive user-interface when large amounts of information need to be presented.The object model is rich and intuitive.
- ExplorerTree Add structured navigation functionality to your applications. The ExplorerTree component adds navigation functionality to your applications, it brings simple information structuring and easy application navigation.
- Expression The Exontrol's eXPression component is a syntax-editor that helps you to define, view, edit and evaluate expressions.
- FileView Provide rich display of file and folder information from within your applications. ExFileView is an ActiveX component for creating Windows Explorer-style functionality. The ExFileView simulates a FolderView control as well.
- Gantt The Exontrol's ExGantt component is our approach to create timeline charts (also known as Gantt charts). Gantt chart is a time-phased graphic display of activity durations. Activities are listed with other tabular information on the left side with time intervals over the bars. Activity durations are shown in the form of horizontal bars. The exGantt component lets the user changes its visual appearance using skins, each one providing an additional visual experience that enhances viewing pleasure.
- Gauge The eXGauge / eXLayers library provides graphics capabilities to visually display and edit the amount, level, or contents of something. The view can show one or more layers, where each layer can display one or more transparent pictures, HTML captions which can be clipped, moved, rotated or combination of them, by dragging the mouse, rolling the mouse wheel, or using the keyboard.
- Grid Exontrol's new eXGrid control an easy-to-implement tree-grid control, provides swift and robust performance and a wide range of formatting features that distinguish it from other grids. The eXGrid is a multi-purpose data visualization system that can display information as a tree, a grid or list, or a combination of both - in either data-bound or unbound mode. This unique synergy between a traditional grid and a traditional treeview allows you to create cutting-edge and visually appealing application interfaces for your end-users.
- Grid-Gantt The Exontrol's eXG2antt component is an editable tree-grid component that includes Gantt chart features. The ex(G)rid-ex(G)antt, shortly exG2antt or ex2Gantt, combines the exGrid and exGantt components in a standalone component. The exG2antt library lets the user changes its visual appearance using skins, each one providing an additional visual experience that enhances viewing pleasure.
- HTML Display and edit built-in HTML without relying on Internet Explorer. exHTML is a display/edit engine for our built-in HTML format. It is written from scratch in C++/C#. It does not rely on IE for rendering HTML, and its functionality is similar to a Web browser for display/edit purposes. exHTML can be used for the provision of extremely flexible user interfaces generated on demand. It can also function as a complex layout management system for text, controls, and graphics. The control doesn't require additional files or libraries like MFC, VB or anything else, and does not subclass the system's EDIT window class.
- List Add an advanced List control to your application. The exList component displays and edit your tabular data. The exList component lets the user changes its visual appearance using skins, each one providing an additional visual experience that enhances viewing pleasure. Skins are relatively easy to build and put on any part of the control.
- ListBar The ExListBar component, an accurate reproduction of the Microsoft Outlook Bar, provides an intuitive user-interface when large amounts of information need to be presented. The ExListBar supports horizontal or vertical orientation. The object model is rich and intuitive.
- Miller The eXMiller component is a file-folder-view component that uses miller columns visualization to display system folders and files. The Miller columns (also known as Cascading Lists) are a browsing/visualization technique that can be applied to tree structures.
- OrgChart The ExOrgChart component permits the totally automatic generation of organigrams. An organigram generally provides a clear picture of the hierarchical position of the various actors. The ExOrgChart control shows a hierarchical display of nodes, each one having an HTML caption, pictures and icons aligned to any side of the node.
- Pivot The Exontrol's eXPivot tool is our approach to provide data summarization, as a pivot table. A pivot-table can automatically sort, count, total or give the average of the data stored in one table or spreadsheet. The user sets up and changes the summary's structure by dragging and dropping fields graphically.
- PropertiesList The ExPropertiesList control (similar to the control used to manipulate properties in Visual Studio) provides an efficient, intuitive and visually compact way to handle data input with minimal coding and user interface design.
- RadialMenu The eXRadialMenu ( radial or pie menu) component is similar to the Microsoft.s OneNote radial menu with ability to customize the appearance and functionality. The component is designed using tree structure of tools and tool collections within the tools
- Ribbon The eXRibbon component, similar with the Microsoft Office's "Fluent User Interface", or Ribbon, allows you to display graphical control elements in the form of a set of toolbars placed on several tabs.
- Scheduler The eXSchedule tool is our approach to provide scheduling of appointments into your application.
- Surface The eXSurface lets you organize your objects to a surface. You can use the tool to generate organigrams, diagrams, graphs, flowcharts and so on.
- Swimlane The ExSwimLane component let's you draw swim lane diagrams. A swim lane (or swimlane diagram) is a visual element used in process flow diagrams, or flowcharts, that visually distinguishes job sharing and responsibilities for sub-processes of a business process. Swim lanes may be arranged either horizontally or vertically.
- Thumbnail The Exontrol's eXThumbnail component provides thumbnail views for your files. Thumbnails are reduced-size versions of pictures or shell items, used to make it easier to scan and recognize them, serving the same role for images as a normal text index does for words.
- ToolBar The eXToolBar component arranges / groups as rows or columns, any kind of graphical control elements such as buttons, icons, drop downs, editors, and so on, to let user choose quickly, what function / procedure to run. The eXToolBar component is written from scratch, uses EBN technology to let the user changes its visual appearance using skins, and requires no dependencies to any other third party library.
- ToolBar.CRD The eXToolBar.CRD component is a graphical control element on which on-screen buttons, icons, menus, or other input or output elements are placed.
- Tree Add an enhanced exTree component to your application. exTree provides the entire range of capabilities you would expect to see in a state-of-the-art tree component. The exTree control simulates a simple tree, a multi-column tree, a list or a listview control.
- TreeCube The eXTreeCube library provides fisheye representation / cube map texturing of different components such as calendar , multiple - columns tree view and so on.
- XMLGrid Exontrol's new eXMLGrid control provides an innovative grid view look and handles data in XML fashion way. It provides swift and robust performance and a wide range of formatting features never seen on other grids. The eXMLGrid component can be seen as a generalized tree control that allows resizing the node's indentation at runtime. The eXMLGrid component lets the user changes its visual appearance using skins, each one providing an additional visual experience that enhances viewing pleasure. Skins are relatively easy to build and put on any part of the control.
-
JS Components
- Bezier
- Calendar The ExCalendar library contains two components, simple version and drop-down version that allow you to select a date with a nice GUI. You can select the date between 1/1/100 and 12/31/9999, Both versions support images, colors, font attributes, tooltips for any date.
- ComboBox The eXComboBox represents some of the most advanced combobox technology available in the components marketplace. A combo box is a commonly-used GUI tool. It is a combination of a drop-down list or list box and a single-line textbox, allowing the user either to type a value directly into the control or choose from the list of existing options.
- ICalendar The ExICalendar library implements the ICalendar data format, according with Internet Calendaring and Scheduling Core Object Specification, RFC 5545. The iCalendar data format represents exchanging calendaring and scheduling information such as events, to-dos, journal entries, and free/busy information, independent of any particular calendar service or protocol. The iCalendar format is suitable as an exchange format between applications or systems. The format is defined in terms of a MIME content type.
- Gantt The Exontrol's ExGantt component is our approach to create timeline charts (also known as Gantt charts). Gantt chart is a time-phased graphic display of activity durations. Activities are listed with other tabular information on the left side with time intervals over the bars. Activity durations are shown in the form of horizontal bars. The exGantt component lets the user changes its visual appearance using skins, each one providing an additional visual experience that enhances viewing pleasure.
- Gauge The eXGauge / eXLayers library provides graphics capabilities to visually display and edit the amount, level, or contents of something. The view can show one or more layers, where each layer can display one or more transparent pictures, HTML captions which can be clipped, moved, rotated or combination of them, by dragging the mouse, rolling the mouse wheel, or using the keyboard.
- Graph
- Menu The ExMenu component is a complete new type of control that displays and handles more than a menu for your application. The ExMenu simulates menu bar, popup menu, options button, toolbar, pick list, and more. Make you application more intuitive using the ExMenu.
- OrgChart The ExOrgChart component permits the totally automatic generation of organigrams. An organigram generally provides a clear picture of the hierarchical position of the various actors. The ExOrgChart control shows a hierarchical display of nodes, each one having an HTML caption, pictures and icons aligned to any side of the node.
- Pivot The Exontrol's eXPivot tool is our approach to provide data summarization, as a pivot table. A pivot-table can automatically sort, count, total or give the average of the data stored in one table or spreadsheet. The user sets up and changes the summary's structure by dragging and dropping fields graphically.
- RadialMenu The eXRadialMenu ( radial or pie menu) component is similar to the Microsoft.s OneNote radial menu with ability to customize the appearance and functionality. The component is designed using tree structure of tools and tool collections within the tools
- Scheduler The eXSchedule tool is our approach to provide scheduling of appointments into your application.
- ScrollBar The Exontrol's newly exScrollBar control simulates vertical or horizontal scroll bar, slider, track, volume or gauge controls.
- Surface The eXSurface lets you organize your objects to a surface. You can use the tool to generate organigrams, diagrams, graphs, flowcharts and so on.
- Swimlane The ExSwimLane component let's you draw swim lane diagrams. A swim lane (or swimlane diagram) is a visual element used in process flow diagrams, or flowcharts, that visually distinguishes job sharing and responsibilities for sub-processes of a business process. Swim lanes may be arranged either horizontally or vertically.
- Tree Add an enhanced exTree component to your application. exTree provides the entire range of capabilities you would expect to see in a state-of-the-art tree component. The exTree control simulates a simple tree, a multi-column tree, a list or a listview control.
-
Tools
- eXHelper (how to tool) The Exontrol's eXHelper tool helps you to find easy and quickly the answers and the source code for your questions regarding the usage of our UI components.
- eXInstaller (installer/uninstaller tool) The ExInstaller is a software component and application programming interface (API) for Microsoft Windows OS used for the installation, maintenance, and removal of our software. The ExInstaller is the base tool that installs / uninstalls any of our software products. The installation information and the files themselves, are packaged in installation packages ( .LZW files ).
- eXImages (BASE64 tool) The ExImages tool is a BASE64 encoder/decoder tool, which helps you to generate encoded-BASE64 strings for Images, VisualAppearance.Add, HTMLPicture, ... methods from icons, EBN or any picture files.
- eXEBN (skining tool) Tool to view, create, edit EBN files. Generally, the EBN is a set of UI elements that are built as a tree where each element is anchored to its parent element.
- eXETB (skining tool for eXTab) Tool to view, create, edit ETB files ( the ETB provides skin capabilities for eXTab component ). Generally, the ETB is a set of UI elements that are built as a tree where each element is anchored to its parent element.
- eXCRD (layout tool) The Exontrol's Custom Row Designer ( exCRD ) is a WYSWYG tool to build new layouts for cells/nodes, items/rows or columns/fields. The exCRD tool generates CRD strings from the layout you built. The syntax of CRD strings is designed to be easy to build, change and read.
-
COM Components
- Download
- FAQ
- ToolBar.CRD (Related)
- General
- ABL - OpenEdge
- AutoIt - AutoItScript
- C++
- C++ Builder
- dBASE Plus
- Delphi
- JS / JScript / JavaScript
- LABView - National Instruments
- Microsoft Dynamics Ax - Axapta (X++)
- Microsoft Dynamics NAV (C/AL)
- Microsoft Office - Access/Excel/Word
- NET Framework
- PowerBuilder
- VB(A)
- VBScript
- VFP
- Visual DataFlex (Data Access)
- WPF
- Xbase++
- Get Started
- Testimonials
- Gallery
- Contact
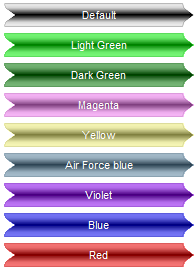
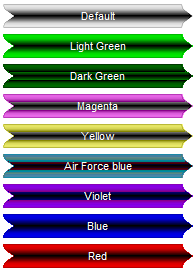
Most of our UI component supports skinning, or in other words you can define how parts of the component may looks like. In this tutorial we will apply skins to bars in the eXG2antt component. The tutorial provides code for Access, VB6, Visual FoxPro, VB.NET, C#, C++,Visual DataFlex. If the NET Assembly is listed in the programming language name it means that the section is applied to NET Assembly Version of the component, else the COM or ActiveX version is being used. Generally speaking, if any of our components provides the VisualAppearance property it means that the visual appearance for almost all visible parts of the component can be changed using EBN objects. The Exontrol's eXButton/COM installs a WYSWYG Builder ( Builder.exe ) that helps creating and editing EBN files ( skin files ).
The following tutorial shows:
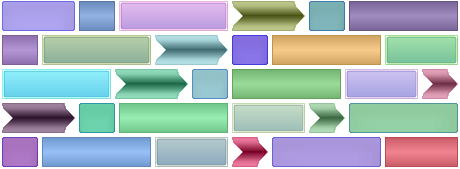
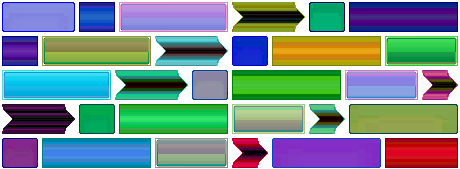
- applying a skin object ( EBN ) to a part of the component, in our case the bars in the chart
- applying a transparent skin object ( EBN ) to a part of the component
- resizes the part of the component being displayed using skins, for different effects
- shows the bars using transparent colors, in case they get intersected
- showing the skin object with a different color
- applying different colors to different EBN objects
- options to add the EBN files in your project
Also, you can view the following items:
 Create a complex EBN file in 1 minute.
-
Rendering the EBN objects in the component.
-
Browsing EBN objects using the Exontrol's eXPropertiesList component
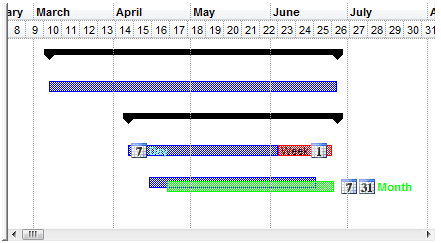
The first thing we need is to insert the ebn file to VisualAppearance collection as in the following sample. Shortly, the Add method of the VisualApearance collection is called, to add a new skin file, and the Color property of the Task bar is being changed to indicate the index of the skin file being used, in the highest byte. The sample uses the rect.ebn file that looks like
which is applied to Task bars.
- Access.
With G2antt1
    .BeginUpdate
        .VisualAppearance.Add 1, "C:\Temp\rect.ebn"
        With .Chart.Bars("Task")
            .Color = &H1000000
        End With
    .EndUpdate
End With
- VB6.
With G2antt1
    .BeginUpdate
        .VisualAppearance.Add 1, "C:\Temp\rect.ebn"
        With .Chart.Bars("Task")
            .Color = &H1000000
        End With
    .EndUpdate
End With
- VFP.
With thisform.G2antt1
    .BeginUpdate
        .VisualAppearance.Add(1, "C:\Temp\rect.ebn")
        With .Chart.Bars("Task")
            .Color = 0x1000000
        EndWith
    .EndUpdate
EndWith
- VB.NET ( ActiveX version ).
With AxG2antt1
    .BeginUpdate()
    .VisualAppearance.Add(1, "C:\Temp\rect.ebn")
    With .Chart.Bars("Task")
        .Color = &H1000000
    End With
    .EndUpdate()
End With
- VB.NET ( NET Assembly ).
With Exg2antt1
    .BeginUpdate()
    .VisualAppearance.Add(1, "C:\Temp\rect.ebn")
    With .Chart.Bars("Task")
        .Color32 = &H1000000
    End With
    .EndUpdate()
End With
- C# ( ActiveX version ).
axG2antt1.BeginUpdate();
axG2antt1.VisualAppearance.Add(1, "C:\\Temp\\rect.ebn");
axG2antt1.Chart.Bars["Task"].Color = 0x1000000;
axG2antt1.EndUpdate();
- C# ( NET Assembly ).
exg2antt1.BeginUpdate();
exg2antt1.VisualAppearance.Add(1, "C:\\Temp\\rect.ebn");
exg2antt1.Chart.Bars["Task"].Color32 = 0x1000000;
exg2antt1.EndUpdate();
- C++ (6.0).
m_g2antt.BeginUpdate();
m_g2antt.GetVisualAppearance().Add(1, COleVariant("C:\\Temp\\rect.ebn") );
m_g2antt.GetChart().GetBars().GetItem( COleVariant("Task" ) ).SetColor( 0x1000000 );
m_g2antt.EndUpdate();
- C++ (2005).
m_g2antt.BeginUpdate();
EXG2ANTTLib::IAppearancePtr spAppearance = m_g2antt.get_VisualAppearance();
spAppearance->Add(1, "C:\\Temp\\rect.ebn" );
EXG2ANTTLib::IChartPtr spChart = m_g2antt.get_Chart();
spChart->Bars->GetItem("Task")->Color =0x1000000;
m_g2antt.EndUpdate();
- Visual DataFlex, you need to call the Send changeAppearance Self, where the changeAppearance procedure looks as following:
Procedure changeAppearance Handle g
    Variant voAppearance
    Get ComVisualAppearance of g to voAppearance
    Handle hoAppearance
    Get Create (RefClass(cComAppearance)) to hoAppearance
    Set pvComObject of hoAppearance to voAppearance
    Get ComAdd of hoAppearance 1 "C:/Temp/rect.ebn" to Nothing
    Send Destroy to hoAppearance

    Variant vChart
    Get ComChart of g to vChart
    Handle hoChart
    Get Create (RefClass(cComChart)) to hoChart
    Set pvComObject of hoChart to vChart

    Variant vBars
    Get ComBars of hoChart to vBars
    Handle hoBars
    Get Create (RefClass(cComBars)) to hoBars
    Set pvComObject of hoBars to vBars
    Variant vBar
    Get ComItem of hoBars "Task" to vBar
    Handle hoBar
    Get Create (RefClass(cComBar)) to hoBar
    Set pvComObject of hoBar to vBar
    Set ComColor of hoBar to |CI$1000000
    Send Destroy to hoBar
    Send Destroy to hoBars

    Send Destroy to hoChart

End_Procedure
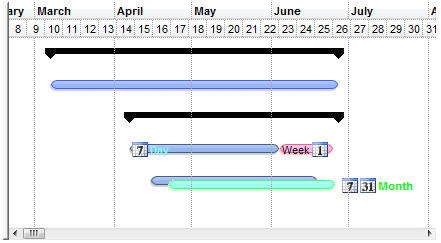
Let's change now the height of the Task bars, so you need to call the Height property as shown in the following sample:So, now the look for our chart will be:
- Access.
With G2antt1
    .BeginUpdate
        .VisualAppearance.Add 1, "C:\Temp\rect.ebn"
        With .Chart.Bars("Task")
            .Color = &H1000000
            .Height = 22
        End With
    .EndUpdate
End With
- VB6.
With G2antt1
    .BeginUpdate
        .VisualAppearance.Add 1, "C:\Temp\rect.ebn"
        With .Chart.Bars("Task")
            .Color = &H1000000
            .Height = 22
        End With
    .EndUpdate
End With
- VFP.
With thisform.G2antt1
    .BeginUpdate
        .VisualAppearance.Add(1, "C:\Temp\rect.ebn")
        With .Chart.Bars("Task")
            .Color = 0x1000000
            .Height = 22
        EndWith
    .EndUpdate
EndWith
- VB.NET ( ActiveX version ).
With AxG2antt1
    .BeginUpdate()
    .VisualAppearance.Add(1, "C:\Temp\rect.ebn")
    With .Chart.Bars("Task")
        .Color = &H1000000
        .Height = 22
    End With
    .EndUpdate()
End With
- VB.NET ( NET Assembly ).
With Exg2antt1
    .BeginUpdate()
    .VisualAppearance.Add(1, "C:\Temp\rect.ebn")
    With .Chart.Bars("Task")
        .Color32 = &H1000000
        .Height = 22
    End With
    .EndUpdate()
End With
- C# ( ActiveX version ).
axG2antt1.BeginUpdate();
axG2antt1.VisualAppearance.Add(1, "C:\\Temp\\rect.ebn");
EXG2ANTTLib.Bar t = axG2antt1.Chart.Bars["Task"];
t.Color = 0x1000000;
t.Height = 22;
axG2antt1.EndUpdate();
- C# ( NET Assembly ).
exg2antt1.BeginUpdate();
exg2antt1.VisualAppearance.Add(1, "C:\\Temp\\rect.ebn");
exontrol.EXG2ANTTLib.Bar t = exg2antt1.Chart.Bars["Task"];
t.Color32 = 0x1000000;
t.Height = 22;
exg2antt1.EndUpdate();
- C++ (6.0).
m_g2antt.BeginUpdate();
m_g2antt.GetVisualAppearance().Add(1, COleVariant("C:\\Temp\\rect.ebn") );
CBar t = m_g2antt.GetChart().GetBars().GetItem( COleVariant("Task" ) );
t.SetColor( 0x1000000 );
t.SetHeight( 22 );
m_g2antt.EndUpdate();
- C++ (2005).
m_g2antt.BeginUpdate();
EXG2ANTTLib::IAppearancePtr spAppearance = m_g2antt.get_VisualAppearance();
spAppearance->Add(1, "C:\\Temp\\rect.ebn" );
EXG2ANTTLib::IChartPtr spChart = m_g2antt.get_Chart();
EXG2ANTTLib::IBarPtr t = spChart->Bars->GetItem("Task");
t->Color =0x1000000;
t->Height = 22;
m_g2antt.EndUpdate();
- Visual DataFlex, you need to call the Send changeAppearance Self, where the changeAppearance procedure looks as following:
Procedure changeAppearance Handle g
    Variant voAppearance
    Get ComVisualAppearance of g to voAppearance
    Handle hoAppearance
    Get Create (RefClass(cComAppearance)) to hoAppearance
    Set pvComObject of hoAppearance to voAppearance
    Get ComAdd of hoAppearance 1 "C:/Temp/rect.ebn" to Nothing
    Send Destroy to hoAppearance

    Variant vChart
    Get ComChart of g to vChart
    Handle hoChart
    Get Create (RefClass(cComChart)) to hoChart
    Set pvComObject of hoChart to vChart

    Variant vBars
    Get ComBars of hoChart to vBars
    Handle hoBars
    Get Create (RefClass(cComBars)) to hoBars
    Set pvComObject of hoBars to vBars
    Variant vBar
    Get ComItem of hoBars "Task" to vBar
    Handle hoBar
    Get Create (RefClass(cComBar)) to hoBar
    Set pvComObject of hoBar to vBar
    Set ComColor of hoBar to |CI$1000000
    Set ComHeight of hoBar to 22
    Send Destroy to hoBar
    Send Destroy to hoBars

    Send Destroy to hoChart

End_Procedure
and the look will be:
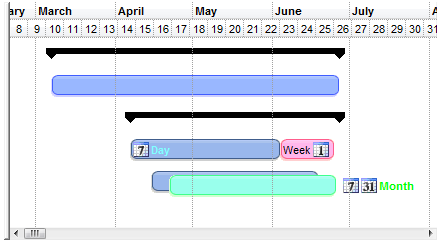
Now, let's change again the skin with a new one called arrow.ebn that shows like follows
. This skin file contains transparent regions for the start and end portion of the arrow ( these were defined in the EBN file ). So, the code actually calls the Add method of the VisualAppearance to add a new ebn file, and changes the Color and Height property of the Task bar.
- Access.
With G2antt1
    .BeginUpdate
        .VisualAppearance.Add 1, "C:\Temp\arrow.ebn"
        With .Chart.Bars("Task")
            .Color = &H1000000
            .Height = 24
        End With
    .EndUpdate
End With
- VB6.
With G2antt1
    .BeginUpdate
        .VisualAppearance.Add 1, "C:\Temp\arrow.ebn"
        With .Chart.Bars("Task")
            .Color = &H1000000
            .Height = 24
        End With
    .EndUpdate
End With
- VFP.
With thisform.G2antt1
    .BeginUpdate
        .VisualAppearance.Add(1, "C:\Temp\arrow.ebn")
        With .Chart.Bars("Task")
            .Color = 0x1000000
            .Height = 24
        EndWith
    .EndUpdate
EndWith
- VB.NET ( ActiveX version ).
With AxG2antt1
    .BeginUpdate()
    .VisualAppearance.Add(1, "C:\Temp\arrow.ebn")
    With .Chart.Bars("Task")
        .Color = &H1000000
        .Height = 24
    End With
    .EndUpdate()
End With
- VB.NET ( NET Assembly ).
With Exg2antt1
    .BeginUpdate()
    .VisualAppearance.Add(1, "C:\Temp\arrow.ebn")
    With .Chart.Bars("Task")
        .Color32 = &H1000000
        .Height = 24
    End With
    .EndUpdate()
End With
- C# ( ActiveX version ).
axG2antt1.BeginUpdate();
axG2antt1.VisualAppearance.Add(1, "C:\\Temp\\arrow.ebn");
EXG2ANTTLib.Bar t = axG2antt1.Chart.Bars["Task"];
t.Color = 0x1000000;
t.Height = 24;
axG2antt1.EndUpdate();
- C# ( NET Assembly ).
exg2antt1.BeginUpdate();
exg2antt1.VisualAppearance.Add(1, "C:\\Temp\\arrow.ebn");
exontrol.EXG2ANTTLib.Bar t = exg2antt1.Chart.Bars["Task"];
t.Color32 = 0x1000000;
t.Height = 24;
exg2antt1.EndUpdate();
- C++ (6.0).
m_g2antt.BeginUpdate();
m_g2antt.GetVisualAppearance().Add(1, COleVariant("C:\\Temp\\arrow.ebn") );
CBar t = m_g2antt.GetChart().GetBars().GetItem( COleVariant("Task" ) );
t.SetColor( 0x1000000 );
t.SetHeight( 24 );
m_g2antt.EndUpdate();
- C++ (2005).
m_g2antt.BeginUpdate();
EXG2ANTTLib::IAppearancePtr spAppearance = m_g2antt.get_VisualAppearance();
spAppearance->Add(1, "C:\\Temp\\arrow.ebn" );
EXG2ANTTLib::IChartPtr spChart = m_g2antt.get_Chart();
EXG2ANTTLib::IBarPtr t = spChart->Bars->GetItem("Task");
t->Color =0x1000000;
t->Height = 24;
m_g2antt.EndUpdate();
- Visual DataFlex, you need to call the Send changeAppearance Self, where the changeAppearance procedure looks as following:
Procedure changeAppearance Handle g
    Variant voAppearance
    Get ComVisualAppearance of g to voAppearance
    Handle hoAppearance
    Get Create (RefClass(cComAppearance)) to hoAppearance
    Set pvComObject of hoAppearance to voAppearance
    Get ComAdd of hoAppearance 1 "C:/Temp/arrow.ebn" to Nothing
    Send Destroy to hoAppearance

    Variant vChart
    Get ComChart of g to vChart
    Handle hoChart
    Get Create (RefClass(cComChart)) to hoChart
    Set pvComObject of hoChart to vChart

    Variant vBars
    Get ComBars of hoChart to vBars
    Handle hoBars
    Get Create (RefClass(cComBars)) to hoBars
    Set pvComObject of hoBars to vBars
    Variant vBar
    Get ComItem of hoBars "Task" to vBar
    Handle hoBar
    Get Create (RefClass(cComBar)) to hoBar
    Set pvComObject of hoBar to vBar
    Set ComColor of hoBar to |CI$1000000
    Set ComHeight of hoBar to 24
    Send Destroy to hoBar
    Send Destroy to hoBars

    Send Destroy to hoChart

End_Procedure
So, the the look will be as:
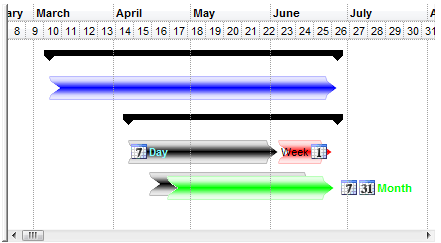
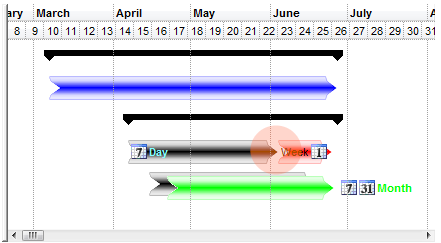
The question will be how can we change the visual appearance of the Task bar so the Day and Week bars will look closer, not interrupted ( like seen in the following picture ) . All we need to do is to create a clone of the skin object, and specifying a new displaying area, by increasing the left and right area. Create a CP skin object as shown in the following sample:
- Access.
With G2antt1
    .BeginUpdate
        .VisualAppearance.Add 2, "c:\temp\arrow.ebn"
        .VisualAppearance.Add 1, "CP:2 -6 0 6 0"
        With .Chart.Bars("Task")
            .Color = &H1000000
            .Height = 24
        End With
    .EndUpdate
End With
- VB6.
With G2antt1
    .BeginUpdate
        .VisualAppearance.Add 2, "c:\temp\arrow.ebn"
        .VisualAppearance.Add 1, "CP:2 -6 0 6 0"
        With .Chart.Bars("Task")
            .Color = &H1000000
            .Height = 24
        End With
    .EndUpdate
End With
- VFP.
With thisform.G2antt1
    .BeginUpdate
	.VisualAppearance.Add(2,"c:\temp\arrow.ebn")
        .VisualAppearance.Add(1, "CP:2 -6 0 6 0")
        With .Chart.Bars("Task")
            .Color = 0x1000000
            .Height = 24
        EndWith
    .EndUpdate
EndWith
- VB.NET ( ActiveX version ).
With AxG2antt1
    .BeginUpdate()
    .VisualAppearance.Add(2, "c:\temp\arrow.ebn")
    .VisualAppearance.Add(1, "CP:2 -6 0 6 0")
    With .Chart.Bars("Task")
        .Color = &H1000000
        .Height = 24
    End With
    .EndUpdate()
End With
- VB.NET ( NET Assembly ).
With Exg2antt1
    .BeginUpdate()
    .VisualAppearance.Add(2, "c:\temp\arrow.ebn")
    .VisualAppearance.Add(1, "CP:2 -6 0 6 0")
    With .Chart.Bars("Task")
        .Color32 = &H1000000
        .Height = 24
    End With
    .EndUpdate()
End With
- C# ( ActiveX version ).
axG2antt1.BeginUpdate();
axG2antt1.VisualAppearance.Add(2, "C:\\Temp\\arrow.ebn");
axG2antt1.VisualAppearance.Add(1, "CP:2 -6 0 6 0");
EXG2ANTTLib.Bar t = axG2antt1.Chart.Bars["Task"];
t.Color = 0x1000000;
t.Height = 24;
axG2antt1.EndUpdate();
- C# ( NET Assembly ).
exg2antt1.BeginUpdate();
exg2antt1.VisualAppearance.Add(2, "C:\\Temp\\arrow.ebn");
exg2antt1.VisualAppearance.Add(1, "CP:2 -6 0 6 0");
exontrol.EXG2ANTTLib.Bar t = exg2antt1.Chart.Bars["Task"];
t.Color32 = 0x1000000;
t.Height = 24;
exg2antt1.EndUpdate();
- C++ (6.0).
m_g2antt.BeginUpdate();
m_g2antt.GetVisualAppearance().Add(2, COleVariant("C:\\Temp\\arrow.ebn") );
m_g2antt.GetVisualAppearance().Add(1, COleVariant("CP:2 -6 0 6 0") );
CBar t = m_g2antt.GetChart().GetBars().GetItem( COleVariant("Task" ) );
t.SetColor( 0x1000000 );
t.SetHeight( 24 );
m_g2antt.EndUpdate();
- C++ (2005).
m_g2antt.BeginUpdate();
EXG2ANTTLib::IAppearancePtr spAppearance = m_g2antt.get_VisualAppearance();
spAppearance->Add(2, "C:\\Temp\\arrow.ebn" );
spAppearance->Add(1, "CP:2 -6 0 6 0" );
EXG2ANTTLib::IChartPtr spChart = m_g2antt.get_Chart();
EXG2ANTTLib::IBarPtr t = spChart->Bars->GetItem("Task");
t->Color =0x1000000;
t->Height = 24;
m_g2antt.EndUpdate();
- Visual DataFlex, you need to call the Send changeAppearance Self, where the changeAppearance procedure looks as following:
Procedure changeAppearance Handle g
    Variant voAppearance
    Get ComVisualAppearance of g to voAppearance
    Handle hoAppearance
    Get Create (RefClass(cComAppearance)) to hoAppearance
    Set pvComObject of hoAppearance to voAppearance
    Get ComAdd of hoAppearance 2 "C:/Temp/arrow.ebn" to Nothing
    Get ComAdd of hoAppearance 1 "CP:2 -6 0 6 0" to Nothing
    Send Destroy to hoAppearance

    Variant vChart
    Get ComChart of g to vChart
    Handle hoChart
    Get Create (RefClass(cComChart)) to hoChart
    Set pvComObject of hoChart to vChart

    Variant vBars
    Get ComBars of hoChart to vBars
    Handle hoBars
    Get Create (RefClass(cComBars)) to hoBars
    Set pvComObject of hoBars to vBars
    Variant vBar
    Get ComItem of hoBars "Task" to vBar
    Handle hoBar
    Get Create (RefClass(cComBar)) to hoBar
    Set pvComObject of hoBar to vBar
    Set ComColor of hoBar to |CI$1000000
    Set ComHeight of hoBar to 24
    Send Destroy to hoBar
    Send Destroy to hoBars

    Send Destroy to hoChart

End_Procedure
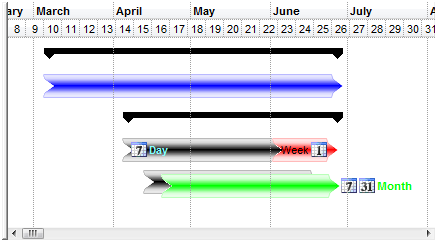
The CP:2 -6 0 6 0 indicates that the skin object index 2 will be displayed in a rectangle with the 6 pixels left, and 6 pixels to the right. This way we got the following:
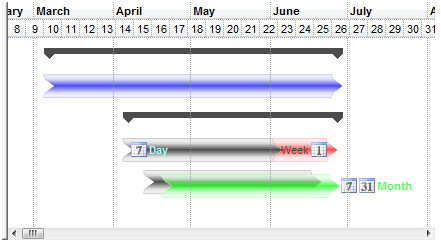
Now how about the green bar that overrides the black bar behind, can we somehow show them transparently? The answer will be yes, all we need is to ShowTransaprentBars property so the code looks like follows:
- Access.
With G2antt1
    .BeginUpdate
        .Chart.ShowTransparentBars = 30
        .VisualAppearance.Add 2, "c:\temp\arrow.ebn"
        .VisualAppearance.Add 1, "CP:2 -6 0 6 0"
        With .Chart.Bars("Task")
            .Color = &H1000000
            .Height = 24
        End With
    .EndUpdate
End With
- VB6.
With G2antt1
    .BeginUpdate
        .Chart.ShowTransparentBars = 30
        .VisualAppearance.Add 2, "c:\temp\arrow.ebn"
        .VisualAppearance.Add 1, "CP:2 -6 0 6 0"
        With .Chart.Bars("Task")
            .Color = &H1000000
            .Height = 24
        End With
    .EndUpdate
End With
- VFP.
With thisform.G2antt1
    .BeginUpdate
    	.Chart.ShowTransparentBars = 30
	.VisualAppearance.Add(2,"c:\temp\arrow.ebn")
        .VisualAppearance.Add(1, "CP:2 -6 0 6 0")
        With .Chart.Bars("Task")
            .Color = 0x1000000
            .Height = 24
        EndWith
    .EndUpdate
EndWith
- VB.NET ( ActiveX version ).
With AxG2antt1
    .BeginUpdate()
    .Chart.ShowTransparentBars = 30
    .VisualAppearance.Add(2, "c:\temp\arrow.ebn")
    .VisualAppearance.Add(1, "CP:2 -6 0 6 0")
    With .Chart.Bars("Task")
        .Color = &H1000000
        .Height = 24
    End With
    .EndUpdate()
End With
- VB.NET ( NET Assembly ).
With Exg2antt1
    .BeginUpdate()
    .Chart.ShowTransparentBars = 30
    .VisualAppearance.Add(2, "c:\temp\arrow.ebn")
    .VisualAppearance.Add(1, "CP:2 -6 0 6 0")
    With .Chart.Bars("Task")
        .Color32 = &H1000000
        .Height = 24
    End With
    .EndUpdate()
End With
- C# ( ActiveX version ).
axG2antt1.BeginUpdate();
axG2antt1.Chart.ShowTransparentBars = 30;
axG2antt1.VisualAppearance.Add(2, "C:\\Temp\\arrow.ebn");
axG2antt1.VisualAppearance.Add(1, "CP:2 -6 0 6 0");
EXG2ANTTLib.Bar t = axG2antt1.Chart.Bars["Task"];
t.Color = 0x1000000;
t.Height = 24;
axG2antt1.EndUpdate();
- C# ( NET Assembly ).
exg2antt1.BeginUpdate();
exg2antt1.Chart.ShowTransparentBars = 30;
exg2antt1.VisualAppearance.Add(2, "C:\\Temp\\arrow.ebn");
exg2antt1.VisualAppearance.Add(1, "CP:2 -6 0 6 0");
exontrol.EXG2ANTTLib.Bar t = exg2antt1.Chart.Bars["Task"];
t.Color32 = 0x1000000;
t.Height = 24;
exg2antt1.EndUpdate();
- C++ (6.0).
m_g2antt.BeginUpdate();
m_g2antt.GetChart().SetShowTransparentBars( 30 );
m_g2antt.GetVisualAppearance().Add(2, COleVariant("C:\\Temp\\arrow.ebn") );
m_g2antt.GetVisualAppearance().Add(1, COleVariant("CP:2 -6 0 6 0") );
CBar t = m_g2antt.GetChart().GetBars().GetItem( COleVariant("Task" ) );
t.SetColor( 0x1000000 );
t.SetHeight( 24 );
m_g2antt.EndUpdate();
- C++ (2005).
m_g2antt.BeginUpdate();
EXG2ANTTLib::IChartPtr spChart = m_g2antt.get_Chart();
spChart->ShowTransparentBars = 30;
EXG2ANTTLib::IAppearancePtr spAppearance = m_g2antt.get_VisualAppearance();
spAppearance->Add(2, "C:\\Temp\\arrow.ebn" );
spAppearance->Add(1, "CP:2 -6 0 6 0" );
EXG2ANTTLib::IBarPtr t = spChart->Bars->GetItem("Task");
t->Color =0x1000000;
t->Height = 24;
m_g2antt.EndUpdate();
- Visual DataFlex, you need to call the Send changeAppearance Self, where the changeAppearance procedure looks as following:
Procedure changeAppearance Handle g
    Variant voAppearance
    Get ComVisualAppearance of g to voAppearance
    Handle hoAppearance
    Get Create (RefClass(cComAppearance)) to hoAppearance
    Set pvComObject of hoAppearance to voAppearance
    Get ComAdd of hoAppearance 2 "C:/Temp/arrow.ebn" to Nothing
    Get ComAdd of hoAppearance 1 "CP:2 -6 0 6 0" to Nothing
    Send Destroy to hoAppearance

    Variant vChart
    Get ComChart of g to vChart
    Handle hoChart
    Get Create (RefClass(cComChart)) to hoChart
    Set pvComObject of hoChart to vChart

    Set ComShowTransparentBars of hoChart to 30
    Variant vBars
    Get ComBars of hoChart to vBars
    Handle hoBars
    Get Create (RefClass(cComBars)) to hoBars
    Set pvComObject of hoBars to vBars
    Variant vBar
    Get ComItem of hoBars "Task" to vBar
    Handle hoBar
    Get Create (RefClass(cComBar)) to hoBar
    Set pvComObject of hoBar to vBar
    Set ComColor of hoBar to |CI$1000000
    Set ComHeight of hoBar to 24
    Send Destroy to hoBar
    Send Destroy to hoBars

    Send Destroy to hoChart

End_Procedure
So we get the following result:
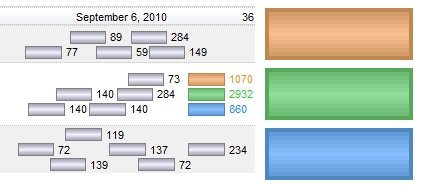
The pictures were generated using the following template:
BeginUpdate
BackColor = RGB(255,255,255)
MarkSearchColumn = False
ShowFocusRect = False
HasLines = False
Indent = 24
DefaultItemHeight = 32
Images("gBJJgBAIDAAGAAEAAQhYAf8Pf4hh0QihCJo2AEZjQAjEZFEaIEaEEaAIAkcbk0olUrlktl0vmExmUzmk1m03nE5nU7nk9n0/oFBoVDolFo1HpFJpVLplNp1PqFRqVTqlVq1XrFZrVbrldr1fsFhsVjslls1ntFptVrtltt1vuFxuVzul1u13vF5vV7vl9v1BAmBhOCwMKwuDw2ExWJxmIx2HyGLx+SyONyuTy2UzWZzmYz2X0Gbx1kUigUAAMwzGeo1Ws1ZV2Go1IAL+1ACZMxm2+52W63Ov2Op1fC13F0un4nJ1vE2BV2XD2e/4vK4fL63V1bMTKZ5/d2pf3vh6Xj2ff3e63G683S5vF0mmAD4+Xx+bA+wAeP5/H6a/9+h8P2eIAGZAiHHYZkDQQ7TuH/Ap4GUUzjPgiCJn+AD7GBAMNQJBD8wFDwAFlEUExJBaHQdCDixM+UARYABuxg/8ZQ5DUQRpEEbQKf8DxPBDiPe08KRdDEZHVIwANU1YRSWAALSdJsnxpHcFO3HsrOI48Ky1IkKQpERZAA9sjHVC77ynEsqwbBE1RVNKHgAQ04yQ1skvDOJDRkZc9ABJYRT5Jk+z/P0pR49sgQHAsaUVApx0aAD+mvOclSZIkYG7MsMxNTUqyw+FFwVRNQwRSwACFUwADvVNHv9IlNu5V02u5UjzVMIUQxHMYABzXdUVVRpxgBXM60DX9MQHTjWrJE0uzfGkXRdXNa0FYMjxBM8vxJM7iWXN8KSlbs31zWlT1Ja0eWxM9tNbbkLUhY1mQtaU62hI9hyZUl0x5H6x3ZLVvwtekyWlYlHXNBF0R5dTszdC1vR1cELVJO9JABLODVvMF8x9deGS1fE3yJXYc4pgOKUDfGE31ZN+Srd13U/VdI1y9uCWBPRl2NE1sWxbeWv9l2f6DSNSXdkTaNtd1WyrncR567mgaHGJLanMLY2laVc2FOjW1JpTuX2sV0YhmMtQpXLct1msZRBLmU421exYbN93XgAFixA9s61ztkzbc4u47LHmb6O8ExSPs0j6NOtyv1hSy8BCm6bHs7eUDXMXb5DOLuJyG5v9CjzWLCkszrqZLS2+/NtbwEQdFN9sPbLPEYFU/Fxj1TV2U7WyahslSdM8O9SPGkieK+8iW33fe1JXNUjvqrnWlo1A2lUnieO+/k1lGMs7RjDwvNiciedUtT6Nd3B+RlaxQJBmx8luULWLLPqxjZ769S/UQe1svPUi6M+D5DzN5a2athyHX9H6f43VIjE3yMTbqrlbB5l3OYgU+ssL7X+rtc+2Nj7AD5vwRkkSCyAoFvvg6/FaiZIIuHbGv9DRxEuQeRjC2FkKH/pvRcs4+b+4MFgH+mmISDIhrHN0dqI5uIjRLGYbOJp2YnRRihAaIsQYiRXIdFVKsSImRKiegOKUYIpxZiwg2MsWokxpjFGs7UY4vxvNmWSKwAEHoRjrHRFMZkToMd3HqOcf4lRBN1IKLMg4vGzjnHeRUeY+yNj5GeIkhpJSFkpF+RKKZFoRj9I6PcZJKSElBIGUUR44ljkBJCT0gI1RclZIeN0YZLRalRKqLsq5XRslhIiWUqY0S1l9HCV8YyyEWB8SuYpHiQEiJIAAkpKJmk4QoX8pJFE3zSKCQEA=")

ScrollHeight = 13
ScrollWidth = 13
ScrollButtonWidth = 13
ScrollButtonHeight = 13

Columns
{
	Add("Task Name").AutoSearch = 1
	Add("Duration")
	{
		AllowSizing = False
		Width = 48
		HeaderAlignment = 1
		ComputedField = "%3-%2"
	}
	Add("Start").Visible = False
	Add("End").Visible = False
}
Chart
{
	AllowCreateBar = False
	NonworkingDaysColor = RGB(196,196,128)
	NonworkingDaysPattern = 6
	FirstVisibleDate = #2/24/2006#
	BackColor = RGB(255,255,255)
	DrawGridLines = 2
	LevelCount = 2
	Level(0)
	{
		Label = "<b><%mmmm%></b>"
		Unit = 16
		DrawGridLines = True
	}
	Level(1)
	{
		Label = "<%ww%>"
		Unit = 256
	}
	Bars("Task")
	{
	}
}
Items
{
	Dim h,h1,h2,h3,h4
	h4 = AddItem("Research into Interface technologies")
	ItemBold(h4) = True
	CellValue(h4,2) = #3/7/2006#
	CellValue(h4,3) = #6/27/2006#
	AddBar(h4,"Summary",CellValue(h4,2),CellValue(h4,3))
	h1 = InsertItem(h4,,"Receive general ideas from other groups")
	CellValue(h1,2) = #3/7/2006#
	CellValue(h1,3) = #6/27/2006#
	AddBar(h1,"Task",CellValue(h1,2),CellValue(h1,3))
	ItemBar(h1,"",513) = RGB(0,0,255)
	ExpandItem(h4) = True

	h = AddItem("Receive specs from other groups")
	ItemBold(h) = True
	CellValue(h,2) = #4/7/2006#
	CellValue(h,3) = #6/27/2006#
	AddBar(h,"Summary",CellValue(h,2),CellValue(h,3))

	h1 = InsertItem(h,,"Analyse received specifications")
	CellValue(h1,2) = #4/7/2006#
	CellValue(h1,3) = #6/4/2006#
	AddBar(h1,"Task",CellValue(h1,2),CellValue(h1,3))
	ItemBar(h1,"",3) = " <b><img>2</img><b><fgcolor=80FFFF>Day</fgcolor></b></b>"
	ItemBar(h1,"",4) = 0
	AddBar(h1,"Task",CellValue(h1,2),CellValue(h1,3),1)
	ItemBar(h1,1,513) = 255
	ItemBar(h1,1,515) = 58
	ItemBar(h1,1,514) = 21
	ItemBar(h1,1,3) = "Week <img>1</img>"

	h1 = InsertItem(h,,"Costing")
	CellValue(h1,2) = #4/15/2006#
	CellValue(h1,3) = #6/19/2006#
	AddBar(h1,"Task",CellValue(h1,2),CellValue(h1,3))
	AddBar(h1,"Task",CellValue(h1,2),CellValue(h1,3),1)
	ItemBar(h1,1,513) = RGB(0,255,0)
	ItemBar(h1,1,515) = 7
	ItemBar(h1,1,18) = 4
	ItemBar(h1,1,3) = " <fgcolor=00FF00><b><img>2</img><img>3</img>Month</b></fgcolor>"
	ItemBar(h1,1,4) = 18


	ExpandItem(h) = True

}
EndUpdate
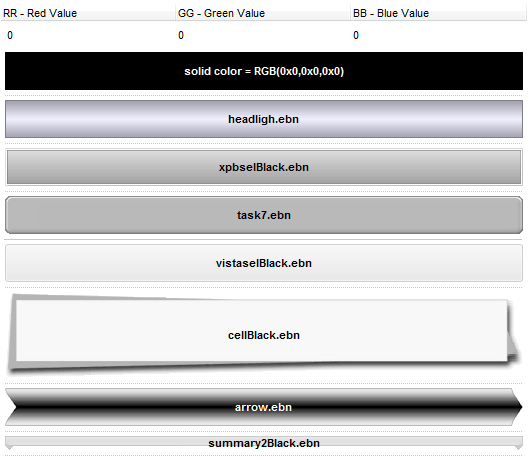
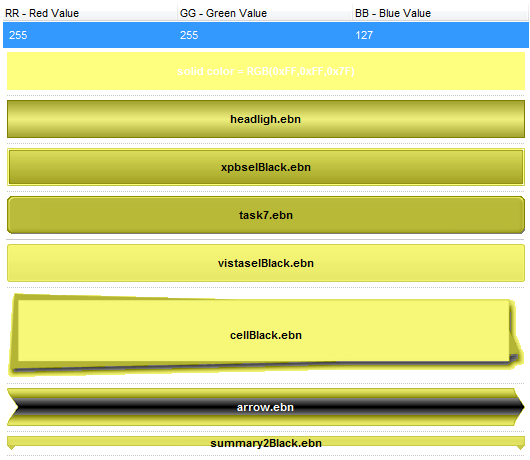
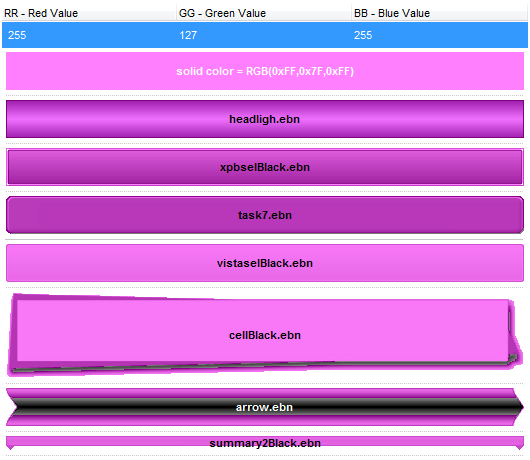
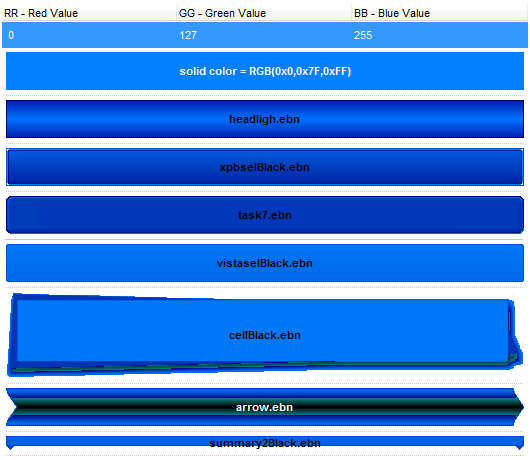
Let's say that you have already defined your skin file ( ebn ) that looks like
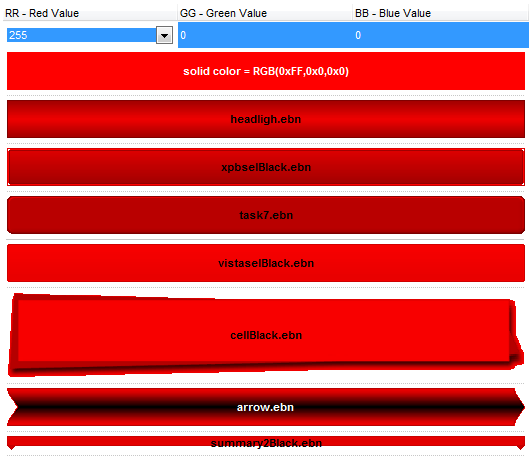
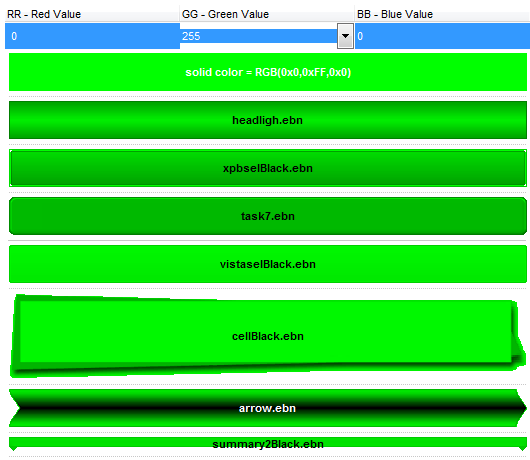
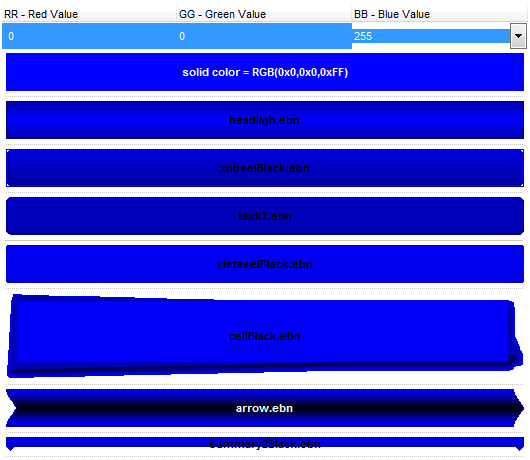
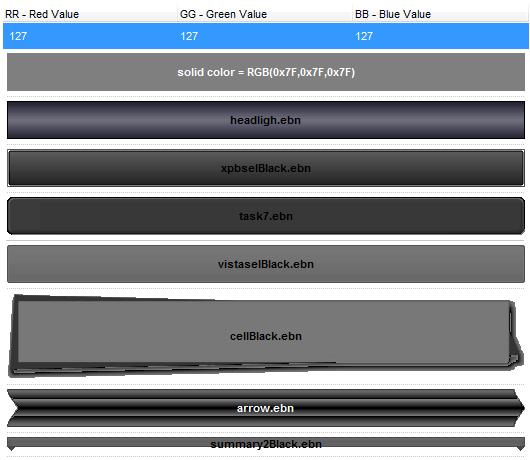
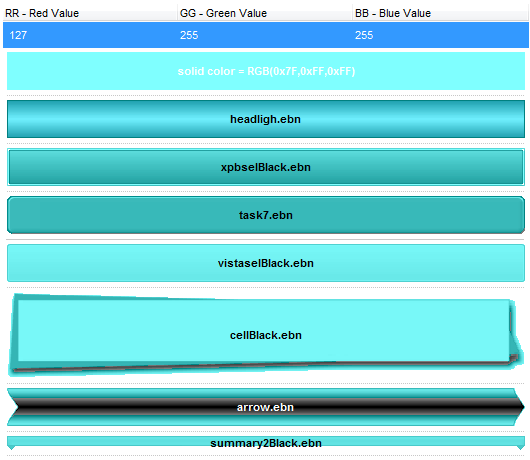
and you need to change its color to be more red as
, without creating a new skin file with a different color. The idea is using the BBGGRR in the color properties as in the following code. By default, 000000 is used, but if you will change the 000000 with 0000FF red color is applied.
- Access.
With G2antt1
    .BeginUpdate
        .VisualAppearance.Add 1, "c:\temp\xpsel.ebn"
        With .Chart.Bars("Task")
            .Color = &H10000FF
            .Height = 16
        End With
    .EndUpdate
End With
- VB6.
With G2antt1
    .BeginUpdate
        .VisualAppearance.Add 1, "c:\temp\xpsel.ebn"
        With .Chart.Bars("Task")
            .Color = &H10000FF
            .Height = 16
        End With
    .EndUpdate
End With
- VFP.
With thisform.G2antt1
    .BeginUpdate
        .VisualAppearance.Add(1, "c:\temp\xpsel.ebn")
        With .Chart.Bars("Task")
            .Color = 0x10000FF
            .Height = 16
        EndWith
    .EndUpdate
EndWith
- VB.NET ( ActiveX version ).
With AxG2antt1
    .BeginUpdate()
    .VisualAppearance.Add(1, "c:\temp\xpsel.ebn")
    With .Chart.Bars("Task")
        .Color = &H10000FF
        .Height = 16
    End With
    .EndUpdate()
End With
- VB.NET ( NET Assembly ).
With Exg2antt1
    .BeginUpdate()
    .VisualAppearance.Add(1, "c:\temp\xpsel.ebn")
    With .Chart.Bars("Task")
        .Color32 = &H10000FF
        .Height = 16
    End With
    .EndUpdate()
End With
- C# ( ActiveX version ).
axG2antt1.BeginUpdate();
axG2antt1.VisualAppearance.Add(1, "c:\\temp\\xpsel.ebn");
EXG2ANTTLib.Bar t = axG2antt1.Chart.Bars["Task"];
t.Color = 0x10000FF;
t.Height = 16;
axG2antt1.EndUpdate();
- C# ( NET Assembly ).
exg2antt1.BeginUpdate();
exg2antt1.VisualAppearance.Add(1, "c:\\temp\\xpsel.ebn");
exontrol.EXG2ANTTLib.Bar t = exg2antt1.Chart.Bars["Task"];
t.Color32 = 0x10000FF;
t.Height = 16;
exg2antt1.EndUpdate();
- C++ (6.0).
m_g2antt.BeginUpdate();
m_g2antt.GetVisualAppearance().Add(1, COleVariant("C:\\Temp\\xpsel.ebn") );
CBar t = m_g2antt.GetChart().GetBars().GetItem( COleVariant("Task" ) );
t.SetColor( 0x10000FF );
t.SetHeight( 16 );
m_g2antt.EndUpdate();
- C++ (2005).
m_g2antt.BeginUpdate();
EXG2ANTTLib::IAppearancePtr spAppearance = m_g2antt.get_VisualAppearance();
spAppearance->Add(1, "C:\\Temp\\xpsel.ebn" );
EXG2ANTTLib::IChartPtr spChart = m_g2antt.get_Chart();
EXG2ANTTLib::IBarPtr t = spChart->Bars->GetItem("Task");
t->Color =0x10000FF;
t->Height = 16;
m_g2antt.EndUpdate();
- Visual DataFlex, you need to call the Send changeAppearance Self, where the changeAppearance procedure looks as following:
Procedure changeAppearance Handle g
    Variant voAppearance
    Get ComVisualAppearance of g to voAppearance
    Handle hoAppearance
    Get Create (RefClass(cComAppearance)) to hoAppearance
    Set pvComObject of hoAppearance to voAppearance
    Get ComAdd of hoAppearance 1 "C:/Temp/xpsel.ebn" to Nothing
    Send Destroy to hoAppearance

    Variant vChart
    Get ComChart of g to vChart
    Handle hoChart
    Get Create (RefClass(cComChart)) to hoChart
    Set pvComObject of hoChart to vChart

    Variant vBars
    Get ComBars of hoChart to vBars
    Handle hoBars
    Get Create (RefClass(cComBars)) to hoBars
    Set pvComObject of hoBars to vBars
    Variant vBar
    Get ComItem of hoBars "Task" to vBar
    Handle hoBar
    Get Create (RefClass(cComBar)) to hoBar
    Set pvComObject of hoBar to vBar
    Set ComColor of hoBar to |CI$10000FF
    Set ComHeight of hoBar to 16
    Send Destroy to hoBar
    Send Destroy to hoBars

    Send Destroy to hoChart

End_Procedure
So we get the following:
when the Color has been &H1000000, so no FF has been used.
The pictures were generated using the following template:
BeginUpdate()
ScrollBySingleLine = True
Columns.Add("Tasks")
Chart
{
	AllowCreateBar = 0
	AllowLinkBars = False
	FirstVisibleDate = #6/21/2005#
	LevelCount = 2
	Level(1)
	{
		Count = 8
		Label = "<%hh%>"
	}
	Level(0).Label = "<%mm%>-<b><%dd%></b>-<%yy%>"
	ResizeUnitCount = 4
}

Items
{
	Dim h, h1,h2
	h = AddItem("Project")
	ItemHeight(h) = 28
	AddBar(h,"Summary",#6/22/2005#,#6/23/2005 16:00#,"","<br>< <b>Project Summary</b> >")
	h1 = InsertItem(h,,"Task 1")
	AddBar(h1,"Task",#6/21/2005 16:00#,#6/23/2005#,"","some <font Comic Sans MS;12><a>text</a></font> here")
	ItemBar(h1,"",4) = 18
	DefineSummaryBars(h,"",h1,"")
	h2 = InsertItem(h,,"Task 2")
	AddBar(h2,"Task",#6/23/2005 8:00#,#6/25/2005#)
	DefineSummaryBars(h,"",h2,"")
	AddLink("Link1",h1,"",h2,"")
	Link("Link1",6) = 0
	Link("Link1",12) = "<bgcolor=FFFFFF> Link <a>1</a> </bgcolor>"
	ExpandItem(h) = True
}
EndUpdate()
Imagine that an EBN is just a Color. As you would paint an object using a solid color, the same you can use using the EBN objects. Shortly, all properties or parameters that support EBN objects is indicated in the help file with the description "The last 7 bits in the high significant byte of the color indicates the identifier of the skin being used to paint the ...." A color expression is generally a combination of RRGGBB values, even it is stored in a DWORD value, which means 4 bytes, so actually the color uses only 3 bytes for RR, GG and BB value, ( red, green, blue ). This way we get one byte that can be used to specify the identifier of the EBN being used. For instance, 0x1000000, indicates the EBN with the identifier 1, since 0x000001, means actually the RGB(0,0,1) which is different. If you need to paint the EBN with a different color, you need to specify the RRGGBB values, as 0x1FF0000 means the EBN object being shown in red as the 0xFF0000 is RGB(255,0,0) which means red, and the 0x1 indicates the EBN with the identifier 1. All controls the support EBN objects provide a VisualAppearance collection. Use the Add method of the VisualAppearance collection to add new EBN objects to the component.
The following table shows the differences between new and old implementations of applying the color on different EBN objects:
NEW OLD The sample shows the arrow.ebn object using different colors. The sample shows different EBN objects with different colors and sizes. The sample shows the bars in the exg2antt control. The following movie shows applying any color on the selected EBN object ( The exMAC style of the exbutton control ):
You can use the EBNColor tool to visualize different colors on EBN objects.
(obsolete, the following screen shots were generated using older versions) The screen shots use the following EBN files: headligh.ebn, xpbselBlack.ebn, task7.ebn, vistaselBlack.ebn, cellBlack.ebn, arrow.ebn, summary2Black.ebn.
The following screen shot shows the EBN objects being shown by default, when no color is applied ( for instance, 0x1000000, 0x2000000, .... )
The following screen shot shows the EBN objects being shown when RGB(255,0,0) is applied ( for instance, 0x1FF0000, 0x2FF0000, .... )
The following screen shot shows the EBN objects being shown when RGB(0,255,0) is applied ( for instance, 0x100FF00, 0x200FF00, .... )
The following screen shot shows the EBN objects being shown when RGB(0,0,255) is applied ( for instance, 0x10000FF, 0x20000FF, .... )
The following screen shot shows the EBN objects being shown when RGB(127,127,127) is applied ( for instance, 0x17F7F7F, 0x27F7F7F, .... )
The following screen shot shows the EBN objects being shown when RGB(127,255,255) is applied ( for instance, 0x17FFFFF, 0x27FFFFF, .... )
The following screen shot shows the EBN objects being shown when RGB(255,255,127) is applied ( for instance, 0x1FFFF7F, 0x2FFFF7F, .... )
The following screen shot shows the EBN objects being shown when RGB(255,127,255) is applied ( for instance, 0x1FF7FFF, 0x2F7FFFF, .... )
The following screen shot shows the EBN objects being shown when RGB(0,127,255) is applied ( for instance, 0x1007FFF, 0x2007FFFF, .... )
Each pixel is the result of a bitwise AND combination between the specified color AND the color in the EBN object. In other words a BLACK imagine ( all zeros ) can not be combined with any color, so the result will be always BLACK. When applying the color to an EBN object its transparent color ( if defined ) is kept, so only the region that defines the EBN object is shown with a different color. The screen shots were generated using the EBN sample in the C:\Program Files\Exontrol\ExGrid folder ( eXGrid )
Options to add the EBN files in your projectCurrently, any EBN file being used should be added using the Add(ID,SKIN) method of the VisualAppearance object. The following sample changes the visual appearance of the selected items in the eXGrid component.
The following screen shot shows the control before applying the EBN file:
and after applying the vistasel.ebn skin (
)
There are several options to provide EBN files in your project as follows:
(path) The path to the EBN file. This option is useful when your application installs files on the client's machine so you can provide the path to EBN files.
With Grid1 .VisualAppearance.Add 1, "C:\Program Files\Exontrol\EBN\vistasel.ebn" .SelBackColor = &H1000000 .SelForeColor = 0 End With(string) The BASE64 encoded string that holds the EBN file. This option is useful if you provide EBN objects in the control's Template page or in code. The Exontrol's exImages tool generates BASE64 encoded strings from EBN files.
With Grid1
    Dim s As String
    s = "gBFLBCJwBAEHhEJAEGg4BHQDg6AADACAxRDAMgBQKAAzQFAYahyGCGAAGEaBQgmFgAQhFcZQSKUOQTDKMIziYBYfgkMIgSbJUgDGAkRRdDSOYDmGQYDiCIoRShOMIjHLUXxtDaIZwhEAoJa0HAkABRVIRNLoARTAaeJKoSboJBGGwUQjQUB1HRNDy7JasY4GURYRDKY4RDSMFiQTZNVypAaIYqqa4JPrWNYqXhAdLgAKcSTtF6ZZjkCb4apqTpNVDeWCRPkDYYDBLJNZ0LT1FYZPLDZzlCrJCiCcwAY5AdYZBiQAS5SzLIqsWx7Cq4AJtWhaVwxXIEI5CADPchveTqNrvCaZW7FdAwTq+dw1XqVczuXLsPADI6gcZNeq6Xo7GEbJZEaa4bF4bh/guUZSuUEISgGJJGHQOocgyIwZAKKhaAAIQTH2MYhjQJBRAmZ5uiQIYIjmU5dlECQBkONJ8DsTIznSYQok+Ux4hmAhgjgKgMgOYJoEYDYEmECBSA6AZPmOPJNgAIAjjiTA/E4YpIn0PJOBOdJ1DmYhoiIJ4KSyLgugqIwIjYMYKmIQ54mcLJPCOEJCSuIoSCMOBPkORJbD8DpzFYRIRiQWQeEqEhkkkIhOhKZJ5CYQg/g8Q4IncNwJmgPJ2DoJBDFoXYXk6eR6GGGAmCmFhkhmZg5iSVlLHOJJ5DaCRZGiaYRA0eZSHYO5nFmYh3h4Z5Jm4foeigAxeGwOomnmRgOD2DojnCcA2iiKgyguIxpAoPo"
    s = s + "SiOKRKEaFYkmiWYwmuIRliOLhBDcKZ6gSl4qDqCokimahqiaJYqk2SYwmyJwgmOYJsD8DwjHqNItisWpejqLhrkqYo+i6a56naNw/g+E42jCApPgOOJ8gkLI5ALGpsmsRpNjSbQLFKUo0CwQ4+kcP2TEIIw5C2e4EnOOAuDu345m4a4mmWOpOEsEJxjaT4TkYJg5i8O5UnWPQvHuWp4j6b4rnaeY/k4Y54noPIvAOSJ9hacBziMCZCnCDA3AqQ4wysEpEHCHAInPqgjk8Bw6jGPB2giR4xkwfwikgchMgMJoiA+Y5snSRlLnSdw7DKbJDC+TBzEyTw2xqDJXDmTZzByJJ186axwm+UI0EOYxDlGNBdB8SpSHSTQjE4O5yhOXpbD6dAbHaXI3jUbRnFiVp1H0dxaleNZNGifg/DUKZCAaAgsy8eZGg+A5EnsPZ1guSxtjcNwtlcdJdncPZneedo7GSO4NokxYAcAUHMCwMQYjGD8OoTgRhBjEHiJwL4HRihyA4G8EYxxPCnA4GwLIHgjgZEGA4JAJhcj6DkJUaArwigJDoHAW4TQDj0AOPEcwbBhiIAQQE"
    .VisualAppearance.Add 1, s
    .SelBackColor = &H1000000
    .SelForeColor = 0
End With
In order to generate the BASE64 encoded string from your EBN file do the following:
- Run the eXImages tool
- Run the Windows Explorer and select or locate the EBN file. Press the CTRL + C or drop the EBN file in the middle panel ( Drag here files such of .bmp, .gif, .ebn, ... )
- The clipboard contains the generated BASE64 string, or you can copy it from the right panel of the eXImages tool. Generally, the string is long, so you can use the s definition to insert it to your code.
(array) A byte[] or safe arrays of VT_I1 or VT_UI1 expression that indicates the content of the EBN file. This option is useful if you want to provide the EBN files in the project resources. The idea is that you have to provide a safe array of bytes to the Skin parameter of the Add method. For instance, the VB6 provides the LoadResData function, the VB/NET or C# provides an internal class Resources where all items in the resources can be accessed through public properties.
VB6
With Grid1
    .VisualAppearance.Add 1, LoadResData(101, "CUSTOM")
    .SelBackColor = &H1000000
    .SelForeColor = 0
End With
In order to insert the EBN file to the project resources do the following:
- Click the VB Resource Editor button in the toolbox.
- Once the VB Resource Editor tool is opened, click the Add Custom Resource ... button in the toolbox
- Locate, Select the EBN file in the opened file/folder dialog, and press Open button
- The "CUSTOM"\101 item should be inserted in the resource file.
- Click the Save button, so the RES file is being associated with your project.
VB/NET
With Exgrid1
	.VisualAppearance.Add(1, WindowsApplication1.My.Resources.vistasel)
	.SelBackColor32 = &H1000000
	.SelForeColor = Color.Black
End With
In order to insert the EBN file to the project resources do the following:
- Select the Project\Properties... from the VS menu
- Click the Resources page
- Click the Add Resource and then Add Existing File...
- Locate, Select the EBN file in the opened file/folder dialog, and press Open button
- The vistasel item is being generated and so it can be accessed in code using: WindowsApplication1.My.Resources.vistasel
C#
exgrid1.VisualAppearance.Add(1, WindowsApplication1.Properties.Resources.vistasel);
exgrid1.SelBackColor32 = 0x1000000;
exgrid1.SelForeColor = Color.Black;
In order to insert the EBN file to the project resources do the following:
- Select the Project\Properties... from the VS menu
- Click the Resources page
- Click the Add Resource and then Add Existing File...
- Locate, Select the EBN file in the opened file/folder dialog, and press Open button
- The vistasel item is being generated and so it can be accessed in code using: WindowsApplication1.Properties.Resources.vistasel