® Copyright 1999-2007 by Exontrol Software, Inc. All Rights Reserved.
The Exontrol's Custom Row Designer ( exCRD ) is a WYSWYG tool to build new layouts for cells/nodes, items/rows or columns/fields. The exCRD tool generates CRD strings from the layout you built. The syntax of CRD strings is designed to be easy to build, change and read. Using CRD strings is powerful than preformatted card view, group view formats, nested bands, and so on, since you are free to define the full layout of the cell/node, item/row or a column/field.
- Start Here, CRD Syntax
- Introducing the exCRD tool
- Start building CRD strings using the exCRD tool
- new Display Icons, Images, Pictures and EBN objects
- Download exCRD tool
Start Here, CRD Syntax
For instance, here are few simple CRD strings:
- The CRD string `1,2` divides the cell in two parts, the left side displays the first column, and the right part displays the second column. Similar with horizontally splitting a cell in two pieces.
- The CRD string `1/2` splits vertically the cell in two parts, where the upper part displays the first column, and the down part displays the second column. Similar with vertically splitting a cell in two pieces.
- The CRD string `1/2,3` splits a cell in two, the upper part displays the first column, the bottom part is divided in other two parts, where the left part displays the second column, and the right part displays the third column.

- The CRD string `18;"Ca<u>pti</u>on"[a=17]/1,(2/3)` splits vertically the cell in two parts, the upper part displays the "Caption" string aligned on the center, with the height of 18 pixels, the bottom part is divided in other two parts, the left part displays the first column, and the second part is vertically divided in other two parts, where the upper part displays the second column and the bottom part displays the third column.

-
The CRD string `"Caption"[a=17],(2/5/6/7),(3,8),(4/9)`generates the following layout:
-
The CRD string
generates the following layout.
The CRD syntax in BNF notation is defined like follows:
<CRD> ::= [<Options>] <GroupCRD>
<GroupCRD> ::= <UpPart> [ "|" <DownPart> ]
<UpPart> ::= <Lines>
<DownPart> ::= <Lines>
<Lines> ::= <Line> | "(" <Lines> ")" | <Lines> "/" <Lines>
<Line> ::= [<Height>;] <LeftPart> [ "|" <RightPart> ]
<LeftPart> ::= <Fields>
<RightPart> ::= <Fields>
<Fields> ::= <Field> | "(" <Fields> ")" | <Fields> "," <Fields>
<Field> ::= <Identifier> [<Options>] [ ":" <Width>]
<Identifier> ::= <Index> | <Caption>
<Options> ::= <Options> [ "[" <Option> "]" ]
<Option> ::= <Property> [ "=" <Value> ]
<Property> ::= <letter> | <Property> [ <letter> | <digit> ]
<Value> ::= <Number> | <String>
<Index> ::= <Number>
<Caption> ::= <String>
<Width> ::= <Number>
<Height> ::= <Number>
<Number> ::= <digit><Number>
<String> ::= """<any_character>"""
<digit> ::= 0 | 1 | 2 | 3 | 4 | 5 | 6 | 7 | 8 | 9
The CRD strings may include the following elements:
- Index, represents numbers, a set of digits. For instance, 1 2 3, ... and so on
- Caption, represents strings, and are delimitated by " characters. For instance, "" ( empty string ) "<b>Caption</b>" "test", and so on
- , ( field separator ), delimits the elements in the same line. For instance: 1,"Caption",(3/4/5)
- /, ( line separator ), delimits the elements in different lines. For instance: 1/"Caption"/(2,3,4)
- |, ( divider character ), splits the left and right parts of a line, or top or bottom parts of a group
- (), ( groups ), defines a group
- [], ( options ), specifies options for elements in the layout
- ;, ( line's height separator), specifies the height of the line or the group
- :, ( field's width separator), specifies the width of the field or the group
The Index and Caption element may have one or more of the following options:
- Border option, [b=<Number>], specifies which borders are shown or hidden. The <Number> may be a sum of one or more values like follows:
- 1, top border, draws the top border
- 2, right border, draws the right border
- 4, bottom border, draws the bottom border
- 8, left border, draws the left border
For instance, the [b=5] means that the element draws the top and the bottom borders. For instance, if the [b=0] is at the beginning of the CRD string, it specifies that by default, no borders are shown.
- Background option, [bg=RGB(,<Number>,<Number>,<Number>)] | [bg=<Number>], specifies the background color of the element.
- Foreground option, [fg=RGB(,<Number>,<Number>,<Number>)] | [fg=<Number>], specifies the foreground color of the element. This option has effect only for Caption elements.
The Caption element may have one or more of the following options:
- Alignment option, [a=<Number>], specifies the alignment of the caption in the element. By default, if the option is missing, the caption is aligned to the left. The <Number> may be one of the values like follows:
- 0, TopLeft, Aligns the caption to the top left corner.
- 1, TopCenter, Centers the caption on the top edge.
- 2, TopRight, Aligns the caption to the upper right corner.
- 16, MiddleLeft, Aligns horizontally the caption on the left side, and centers the caption vertically
- 17, MiddleCenter, Puts the caption on the center of the element. (Default)
- 18, MiddleRight, Aligns horizontally the caption on the right side, and centers the caption vertically
- 32, BottomLeft, Aligns the caption to the lower left corner
- 33, BottomCenter, Centers the caption on the lower edge
- 34, BottomLeft, The caption is resized to fit the source
- WordWrap option, [ww], specifies whether the caption is wrapping in the element's client area. If the option is present, the text is arranged on multiple lines, else the text is displayed on a single line.
The options for the CRD string may be ( these options must be always at the beginning of the CRD string ):
- Debug option, [debug], displays debug information when running in the component. Has no effect in the exCRD tool
- Border option, [b=<Number>], specifies which borders are shown or hidden, for all elements in the CRD string. The <Number> may be a sum of one or more values like follows:
- 1, top border, all elements in the CRD layout draw the top border
- 2, right border, all elements in the CRD layout draw the right border
- 4, bottom border, all elements in the CRD layout draw the bottom border
- 8, left border, all elements in the CRD layout draw the left border
- DrawGridLines options, [dgl=0|1|-1], specifies whether the CRD layout draws the grid lines. This option is depending on the component's context.
Introducing the exCRD tool
 The exCRD WYSWYG tool helps you to build CRD strings. The left
side (1) of the exCRD tool displays the layout. The right side includes an edit
control (2) where the CRD string can be changed or updated, the CRD history (3), and a
toolbox (4) to update the borders and the alignment of the text for the selected
element in the layout. Changing the CRD string in the edit control updates
automatically the layout in the left side. Also, changing the layout in the left
side, updates the CRD string the right side edit control. The left side's
context menu (5) includes options to format the selected element in the layout, such
of splitting the element, aligning the element to the right side, or
bottom side, changing the element's background or foreground color, and so on.
The tool's status bar displays information about the selected item in the
context menu.
The exCRD WYSWYG tool helps you to build CRD strings. The left
side (1) of the exCRD tool displays the layout. The right side includes an edit
control (2) where the CRD string can be changed or updated, the CRD history (3), and a
toolbox (4) to update the borders and the alignment of the text for the selected
element in the layout. Changing the CRD string in the edit control updates
automatically the layout in the left side. Also, changing the layout in the left
side, updates the CRD string the right side edit control. The left side's
context menu (5) includes options to format the selected element in the layout, such
of splitting the element, aligning the element to the right side, or
bottom side, changing the element's background or foreground color, and so on.
The tool's status bar displays information about the selected item in the
context menu.
-
The Layout area divides the client area how the CRD format string specifies. Using the mouse or the keyboard you can select a new element. A ticker frame is drawn around the selected element. Once that the user selects an element in the layout area, the portion of CRD text that defines the element is selected in the CRD (2) area. For instance, if you select a caption element, the name of the element including the " characters are selected in the CRD (2) area, so you can use the keyboard to change the name or the index of the element. The toolbox (4) displays the options that can be changed for the selected element. For instance, if you selected a caption element, you can specify the alignment of the caption in the field, the borders around the element, where the text should be wrapped and so on. Use the white tickers to resize the element. While resizing the element in the layout area, the CRD (2) area highlights the portion of the CRD text that defines the width or the height being changed. Use the keyboard to type the width or the height of the element. If the width or the height of the element is missing or it is zero, the control resizes it so the child elements fit the parent's client area. Clicking multiple times in the same element, you get highlighted the parent of the selected element and so on. Use the right click to display the layout's context menu (5). Use the ALT + arrow keys to navigate throw the index elements. Use the CTRL+Z to undo the last operation.
-
The CRD area displays and edits CRD strings. The CRD area is a simple edit control, and can be used to change the CRD string. The Layout (1) area is updated automatically when the user alters the CRD string. Use this area to locate a specific element, and change it's name or its options. To clear the entire layout, select the entire text in the CRD area and press the DELETE key.
-
The History list holds the CRD strings being formatted using the exCRD tool. The CRD strings are saved to the "ExCRD.history" file. The "ExCRD.history" file persists in the same folder where the exCRD tool is. Click the CRD history if you need to save the current layout. If the layout was not saved previously the layout is saved, else the selected layout is loaded and displayed. Use the DELETE key to delete a layout in the history.
-
The Toolbox displays options like border, alignment of the caption for the selected element in the layout (1). Changing an option in the Toolbox automatically updates the Layout (1) and the CRD(2) area.
-
Click an element in the Layout (1) area, and then do a right click to invoke the layout's context menu. The current selection in the CRD area is replaced with the format you chose when selecting an item from the layout's context menu. The layout's context menu includes the following:
1,2 - Splits horizontally a field in two parts.
1,2,3 - Splits horizontally a field in three parts.
1,2,3,4 - Splits horizontally a field in four parts.
1,2,3,4,5 - Splits horizontally a field in five parts.
1,2,3,4,5,6 - Splits horizontally a field in six parts.
1,2,3,4,5,6,"..." - Splits horizontally a field in multiple parts.
|,(#):16 - Aligns the field to the right.
"Caption" - Specifies a caption, instead an index.
"" - Specifies an empty unit.
#[bg=RGB(230,230,230)] - Specifies the part's background color.
#[fg=RGB(255,0,0)] - Specifies the part's foreground color.
1/2 - Splits vertically a field in two parts.
1/2/3 - Splits vertically a field in three parts.
1/2/3/4 - Splits vertically a field in four parts.
1/2/3/4/5 - Splits vertically a field in five parts.
1/2/3/4/5/6 - Splits vertically a field in six parts.
1/2/3/4/5/6/"..." - Splits vertically a field in multiple parts.
|/32;(#) - Aligns the field to the bottom.
Start building CRD strings using the exCRD
tool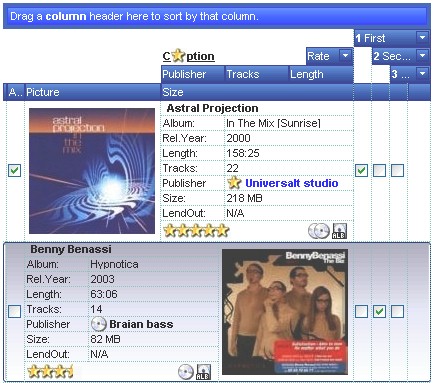
Let's say that we want to have a view to display fields like in the following screen shot. The first step we need to follow is identifying the fields/indexes we need to display in the layout. In our sample we have the following fields:
-
photo, 2
-
artist, 4
-
album, 5
-
release year, 6
-
length, 7
-
tracks, 8
-
publisher, 9
-
size, 10
-
lend out, 11
-
rate, 12
-
availability, 13
Once that we identified the fields, we can start building the layout we want to have.
Here's the steps you need to follow in order to build the above layout:
-
Empty the old CRD string in the tool. Select the entire text in the CRD area, and press DELETE key
-
Right click in the Layout area, and select the 1,2 format.
-
Resize the element 1. Select it, and move the mouse over the right ticker. Click it and start resizing the element. In the same time, you notice that the CRD area highlights the portion of text that defines the width of the element. Type 64, so we have the element 1 with the width of 64 pixels.
-
Splits the element 1 in three parts, to let the photo field in the center. Select the element 1, right click, and select the 1/2/3 format.
-
Specifies the height of the photo field. Click the element 3, move the mouse over the bottom ticker so we can resize the height of the element. While resizing, the CRD area highlights the portion of text that defines the height of the element. Type 64, and you have fixed the height of the photo field to 64 pixels.
-
Removes extra borders for the element 3. Click the element 3, and move the mouse to the toolbox, where you remove the top and bottom borders.
-
Empty the element 1 and 4, because we do not need them. Click the element 1, and type "". Click the element 4, and type "" ( two " characters ).
-
We have obtained the following CRD string `(""[b=11]/64;3[b=10]/""[b=14]):64,2`, and imagine that the photo field goes to the element 3.
-
Split the element 2 in 9 vertical parts, so we can have the other fields displayed in the layout. Select the element 2, right click, select 1/2/3/4/5/6/"..." format. We have only 7 elements, so we need to type the rest of them in the CRD area. Go to the CRD area and select the "..." text, and type 9/10/11. Finally, we got 9 elements.
-
Split last element 11 in two pieces so we can display two fields instead. Click the element 11, right click, and select 1,2 format. Click the element 12, and move the mouse to the right ticker to resize the field. Click and resize the field. While resizing the CRD tool highlights the portion of text that defines the width of the field. Type 48, so we defined the element 12 aligned to the right with the width of 48 pixels.
-
Currently we got: `(""[b=11]/64;3[b=10]/""[b=14]):64,(2/4/5/6/7/8/9/10/(11,12:48))`.
-
Select the element 4, right click, select 1,2. Select the element 4, move the mouse over the right ticker, and resize the element. Type 96. Select the element 4 again, right click, select "Caption". Locate the "Caption" string in the CRD area, and replace it with "Album:"
-
Do the same thing as you did for the element 4, for the elements 5, 6, 7, 8, 9, 10
-
We got: `(""[b=11]/64;3[b=10]/""[b=14]):64,(2/("Album:":96,13)/("RelYear:":96,4)/("Length:":96,5)/("Tracks:":96,6)/ ("Publisher:":96,7)/("Size:":96,8)/("LendOut:":96,9)/(11,12:48))`
-
The last step we need to follow is to replace the index elements with the numbers in our table. Select the element 3 and type 2, as the photo field has the identifier 2. Do the same thing for the rest index elements.
-
Finally, we got the CRD string: `(""[b=11]/64;3[b=10]/""[b=14]):64,(4/("Album:":96,5)/("RelYear:":96,6)/("Length:":96,7)/ ("Tracks:":96,8)/("Publisher:":96,9)/("Size:":96,10)/("LendOut:":96,11)/(12,13:48))`
Display Icons, Images, Pictures and EBN objects
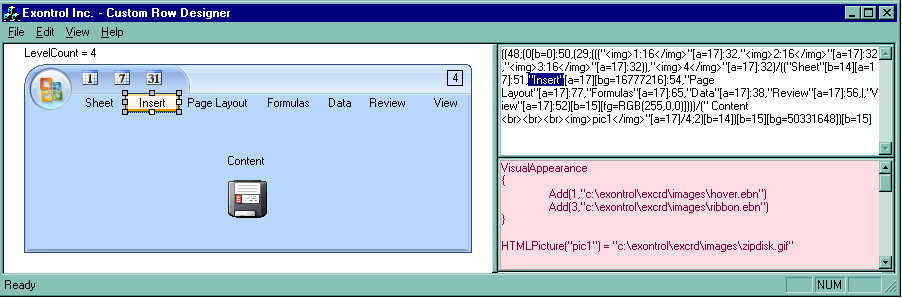
Starting from the version 2.0, the CRD tool includes an Visual-Appearance area to load icons, images, pictures and EBN objects, so the objects in the CRD format may display <img> or <bg> tags. For instance, the <img>1</img> displays the first icon that was previously loaded using the Images or ReplaceIcon method. The <img>pic1</img> displays a custom size picture that was previously loaded using the HTMLPicture property. The [bg=16777216] indicates that the background of the object displays the EBN object with the identifier 1. The 16777216 represents the 0x1RRGGBB, or 0x1000000, where 1 indicates the identifier of the skin object being loaded using the VisualAppearance.Add method.
The following screen shot shows in red the area where visual appearance of the CRD strings may be changed:
The following properties are known:
-
Images(Handle), sets the control's image list at runtime, where the handle may be: A long expression that identifies a handle to an Image list ( the Handle should be of HIMAGELIST type ) or a string expression that indicates the base64 encoded string that holds the icons list. Use the eximages tool to save your icons as base64 encoded format.
-
ReplaceIcon ([Icon], [Index]), Adds a new icon, replaces an icon or clears the control's image list, where Icon may be: A long expression that indicates the icon's handle. By default, the Icon parameter is 0, if it is missing., and the Index may be: A long expression that indicates the index where icon is inserted. By default, the Index parameter is -1, if it is missing.
-
HTMLPicture(Key), Adds or replaces a picture in HTML captions, where the Key may be: A String expression that indicates the key of the picture being added or replaced. If the Key property is Empty string, the entire collection of pictures is cleared. The HTMLPicture specifies the picture being associated to a key. It can be one of the followings:
- a string expression that indicates the path to the picture file, being loaded.
- a string expression that indicates the base64 encoded string that holds a picture object, Use the eximages tool to save your picture as base64 encoded format.
- A Picture object that indicates the picture being added or replaced. ( A Picture object implements IPicture interface ),
If empty, the picture being associated to a key is removed. If the key already exists the new picture is replaced. If the key is not empty, and it doesn't not exist a new picture is added
- VisualAppearance.Add(ID,Skin), Adds or replaces a skin object to
the control, where the ID may be: A Long expression that indicates the index
of the skin being added or replaced. The value must be between 1 and 126, so
Appearance collection should holds no more than 126 elements, and the Skin
may be: A string expression that indicates:
- an Windows XP Theme part, it should start with "XP:". For instance the "XP:Header 1 2" indicates the part 1 of the Header class in the state 2, in the current Windows XP theme. In this case the format of the Skin parameter should be: "XP: Control/ClassName Part State" where the ClassName defines the window/control class name in the Windows XP Theme, the Part indicates a long expression that defines the part, and the State indicates the state like listed at the end of the document. This option is available only on Windows XP that supports Themes API.
- a copy of another skin with different coordinates, if it begins with "CP:" . For instance, you may need to display a specified skin on a smaller rectangle. In this case, the string starts with "CP:", and contains the following "CP:n l t r b", where the n is the identifier being copied, the l, t, r, and b indicate the left, top, right and bottom coordinates being used to adjust the rectangle where the skin is displayed. For instance, the "CP:1 4 0 -4 0", indicates that the skin is displayed on a smaller rectangle like follows. Let's say that the control requests painting the {10, 10, 30, 20} area, a rectangle with the width of 20 pixels, and the height of 10 pixels, the skin will be displayed on the {14,10,26,20} as each coordinates in the "CP" syntax is added to the displayed rectangle, so the skin looks smaller. This way you can apply different effects to your objects in your control. The following screen shot shows the control's header when using a "CP:1 -6 -6 6 6", that displays the original skin on larger rectangles
- the path to the skin file ( *.ebn ). The Exontrol's exButton component installs a skin builder that should be used to create new skins
- the BASE64 encoded string that holds a skin file ( *.ebn ). Use the Exontrol's exImages tool to build BASE 64 encoded strings on the skin file (*.ebn) you have created. Loading the skin from a file ( eventually uncompressed file ) is always faster then loading from a BASE64 encoded string
Shortly, the Visual-Appearance area displays and handles x-script code for the Exontrol.CRD object.